Fifth article of a series on enabling modern ALM practices for an Azure Stream Analytics project - focusing on automated deployment in Azure DevOps.
- Part 1 : 100 - The story of 2 pipelines
- Part 2 : 101 - Local developer experience
- Part 3 : 102 - Provisioning scripts and live job
- Part 4 : 103 - Continuous build
- Part 5 : 104 - Automated deployment
- Part 6 : 105 - Unit testing
- Part 7 : Integration testing - to be written
Context
Now that we have a continuous build pipeline (see 103) it should be easy to enable automated deployments using a release pipeline in Azure DevOps.
For our project we will just deploy to one live environment: staging. Like we discussed earlier, getting that wiring right will allow us to add as many environments as we later could want (integration, UAT, pre-prod, prod…).
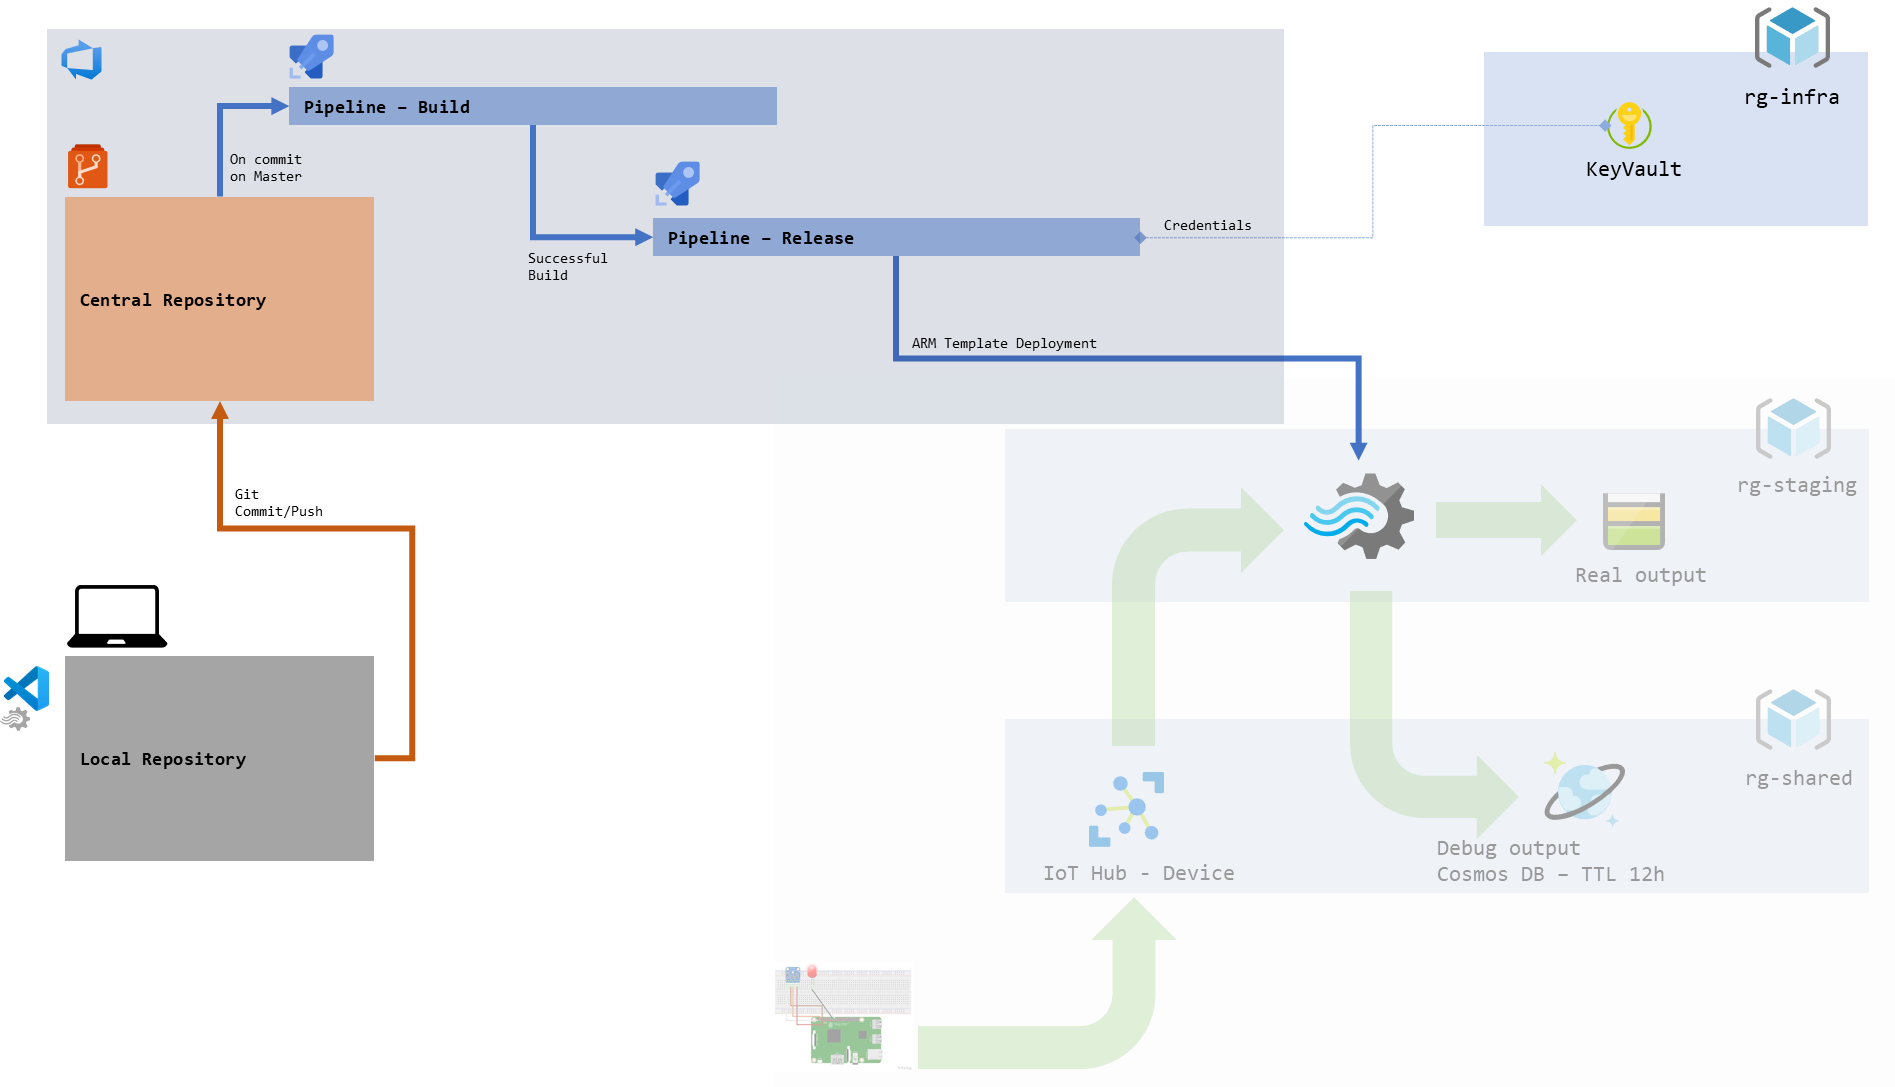
figure 1 - Schema of our development pipeline
Release inputs
Deploying an ASA job via ARM templates will require the release pipeline to receive the following inputs:
- Where/how are we deploying - these are key details that we want to overload after the build
- Target resource group and ASA job name. A good thing that we can rename our job at deployment to add its environment and potentially a version number in a suffix
- Location, as in Azure locations, or else the deployment will always end up being in the default location of the template (
Central US). I haven’t found a way to update that default value in the ASA project config file, not sure if I’m missing something - OutputStartMode, an attribute specific to ASA, its role being covered in the doc. I haven’t had the chance to play much with it and see how to leverage it to be smarter about restarts - if possible at all. Right now I default it to
LastOutputEventTimewhich means “when last stopped” (of course the job needs to have run at least once for that to be available, we should run it manually once if necessary)
- The credentials/secrets of our data inputs and outputs:
- If for the build we avoided loading the real credentials in our ARM template parameters file, now we will have too. Since we’re doing things the right way, we’ll store them in KeyVault, and get them only when needed.
- We’ll see how to do that below, but right now we need to know that a variable group (the way to share variables across pipelines in Azure DevOps) are either linked to KeyVault (all variables are loaded from KeyVault) or not. So we’ll need at least 2 variable groups
- What we’re deploying:
- And of course, our ARM template files themselves, published by our build pipeline as “Build Artifacts”
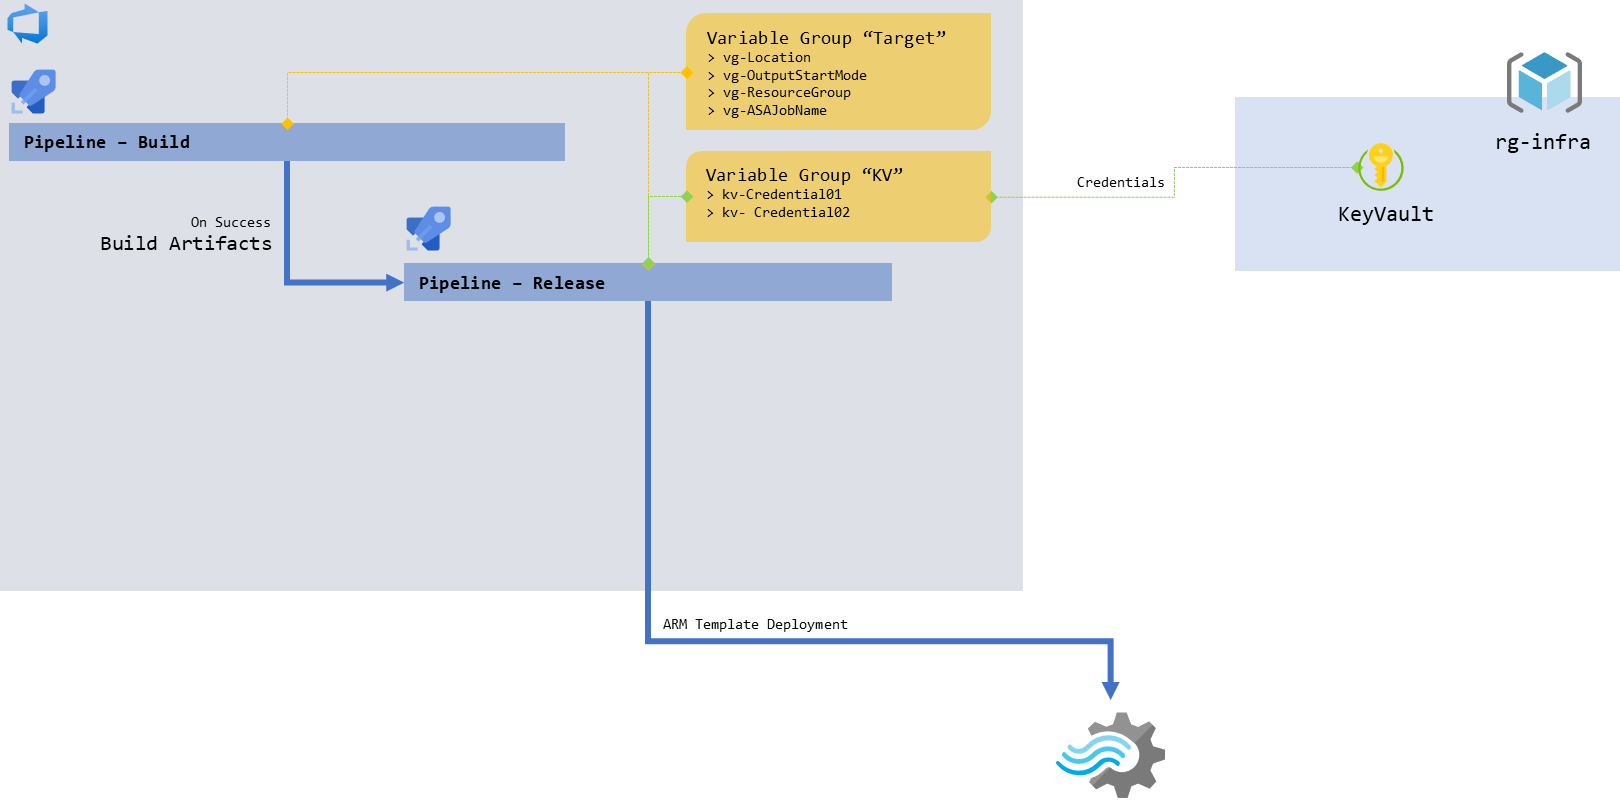
figure 2 - Schema focusing on the release pipeline
Let’s get started by covering those requirements.
Infrastructure
As described above, we need a KeyVault and a couple of variable groups. Let’s create that.
KeyVault
The creation of the KeyVault, and management and its secrets, can be done via the Azure portal, the Azure CLI or the Azure PowerShell Az module.
We’ll name it ASATest1KeyVault, and put it in its own resource group, rg-infra, or at least the shared resource group, rg-shared, but not in the staging resource group, rg-staging.
That way it will be more natural to re-use it, and its secrets, across environments and potentially projects (hello governance). This will also make it more durable - since the point of having a staging resource group is to be able to delete and recreate it at will.
Once created, we’ll create the secrets we need, in this case:
| Name | Value |
|---|---|
| kvinputIoTHub1key | the key of the IoT Hub we’re using as our live input |
| kvoutputBlobStorage1key | the key of the storage account we’re using as our live output |
When trying to link the KeyVault in the Variable Group, the authentication process can hang indefinitely. It can be solved in KeyVault, by manually creating an access policy for the Azure DevOps project application principal (service account) with List/Get permissions on Secrets. The application principal id can be found in the Azure DevOps project settings (bottom left), Service Connections tab, editing the right subscription and going use the full version of the service connection dialog. It should be under Service principal client ID.
Variable Groups
Back in Azure DevOps, let’s go back to Pipelines > Library where variable groups are managed.
We should already see the variable group we created previously, hosting our resource group name variable (StagingVariableGroup). We can add the 3 additional variables required for release:
| Name | Value |
|---|---|
| vg-ResourceGroup | rg-asateststaging |
| vg-ASAJobName | MyStreamingJobstaging |
| vg-Location | Canada Central |
| vg-OutputStartMode | LastOutputEventTime |
Once this is done, we can create a new variable group, named KeyVaultVariableGroup. For this one we will enable Link secrets from an Azure key vault as variables and reference our newly created KeyVault from above. Once this is done, we can add variables - which means selecting which secrets from the KeyVault are going to be accessible in our pipelines.
We have our inputs, we can create our release pipeline.
Release pipeline
The easiest way to get started here is to go to the latest successful build, and trigger a release from there. Another option is to go straight to Releases, under Pipelines, and start from there.
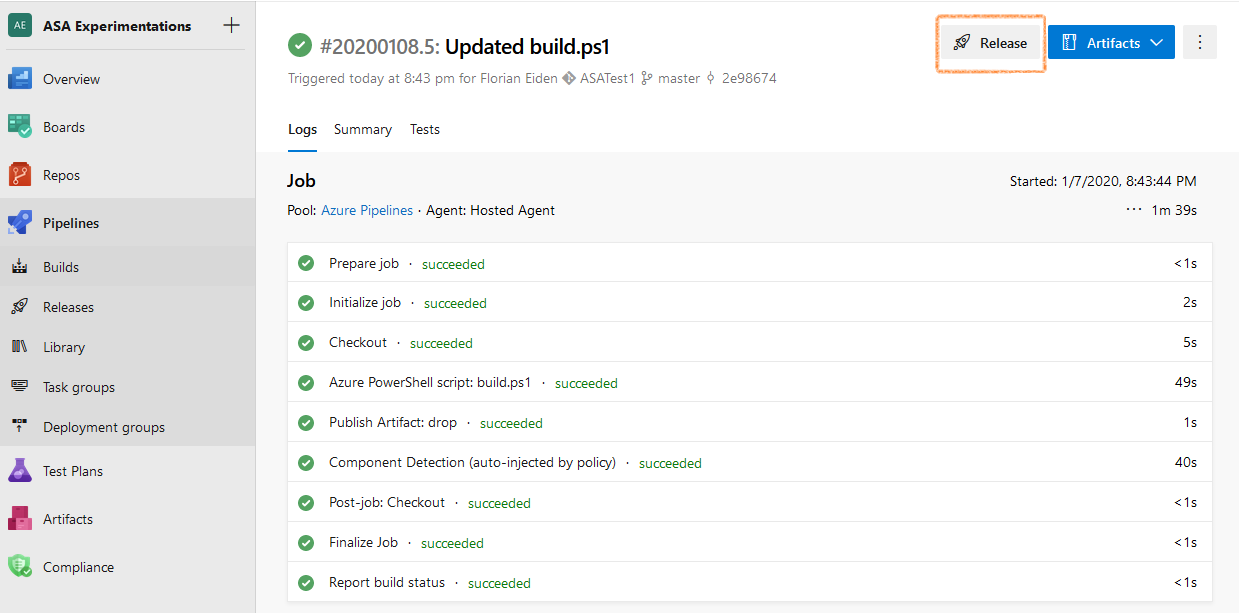
figure 3 - Screenshot of Azure DevOps: successful build
Here there is no fancy YAML experience yet (at the time of writing anyway), so we’ll use the “classic” experience and start with an empty job. Let’s rename the stage to “Staging” and save.
We should now have a simple release pipeline, triggered from a build - from which it gets its artifacts, with a single empty stage (1 job, 0 task).
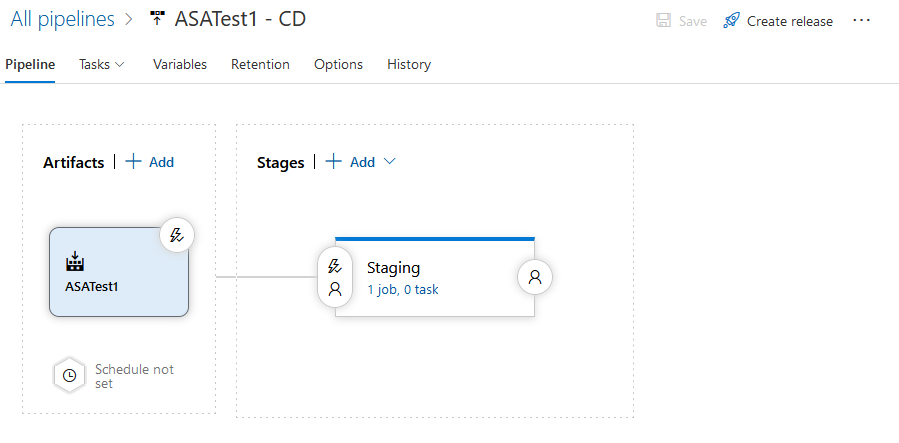
figure 4 - Screenshot of Azure DevOps: our empty release pipeline
By default that pipeline is in “Continuous deployment” mode, meaning a release is created every time a new build is available. If necessary it can be changed by clicking on the little lightning next to the build icon.
We need to allow the release pipeline to access the variable groups we created earlier. In Variables above the schema, in the Variable groups tab, we should Link variable group both for KeyVaultVariableGroup and StagingVariableGroup.
For kicks, we can create a new release, and observe how nothing happens since our Staging stage is empty. Let’s think about what needs to happen during our release.
Steps
This one is straightforward:
- The first step is to gather our variables
- The second step is to update our ARM template parameters file with them
- The third step is to execute the ARM deployment in
incrementalmode (nothing is done if nothing has changed)
Since we’re on a roll with PowerShell, let’s just keep using it.
release.ps1
I have to be honest, wiring KeyVault credentials from a variable group to a FilePath script (not inline) has been a struggle.
Most of the documentation explains how to do that for YAML mode (with YAML syntax) which is not generally available for releases yet. So I ended up just bypassing the whole issue and grabbing the credentials directly from PowerShell using Get-AzKeyVaultSecret (so yes, the KeyVault variable group is actually not necessary in what follows). Hopefully this is a temporary workaround that should be resolved once the YAML experience is released.
Update : I researched the topic a bit more since then, and shared my findings for those interested. The short version is that the approach I take below is quite acceptable
In our deploy folder, let’s add a release.ps1 file containing :
# Step 1: map arguments

write-host "101 - Mapping arguments"

$sourceProjectName = "ASATest1"
$targetResourceGroup = ${ENV:VG-RESOURCEGROUP}

$stagingDirectory = "$ENV:SYSTEM_ARTIFACTSDIRECTORY\$ENV:RELEASE_PRIMARYARTIFACTSOURCEALIAS\drop"
$templatePath = "$stagingDirectory\$sourceProjectName.JobTemplate.json"
$validationParametersPath = "$stagingDirectory\$sourceProjectName.JobTemplate.parameters.json"
$finalParametersPath = "$stagingDirectory\$sourceProjectName.JobTemplate.parameters.final.json"

$vaultName = "fleideKV"

$liveInputIoTHub1key = (Get-AzKeyVaultSecret -VaultName $vaultName -Name "kvinputIoTHub1key").SecretValueText
$liveOutputBlobStorage1key = (Get-AzKeyVaultSecret -VaultName $vaultName -Name "kvoutputBlobStorage1key").SecretValueText

# Step 2 : Update parameters with live values

write-host "201 - Inserting live parameters"

$parametersData = Get-Content $validationParametersPath | ConvertFrom-Json

$parametersData.parameters.Input_IoTHub1_sharedAccessPolicyKey.value = $liveInputIoTHub1key
$parametersData.parameters.Output_BlobStorage1_Storage1_accountKey.value = $liveOutputBlobStorage1key

$parametersData.parameters.StreamAnalyticsJobName.value = "${ENV:VG-ASAJOBNAME}"
$parametersData.parameters.Location.value = "${ENV:VG-LOCATION}"
$parametersData.parameters.OutputStartMode.value  = "${ENV:VG-OUTPUTSTARTMODE}"

write-host "202 - Generating validation parameter file"
$parametersData | ConvertTo-Json | Out-File $finalParametersPath

# Step 3: execute the deployment

write-host "301 - Executing Incremental ARM RG Deployment"

New-AzResourceGroupDeployment `
  -ResourceGroupName $targetResourceGroup `
  -TemplateFile $templatePath `
  -TemplateParameterFile $finalParametersPath `
  -Mode Incremental

# Step 9 : Done
write-host "999 - All done"
As discussed above, we had to be clever to load the KeyVault secrets. After that it’s straightforward compared to our buildscript. Talking about build.ps1, now we understand why we had to move release.ps1 in the artifacts folder then: so it can be used in the release pipeline which doesn’t have access to the repository.
Azure Powershell task
The final step is to create a task in our Staging stage of the release pipeline to run our script. In the stage screen we can add a new Azure Powershell task, linked to our Azure subscription, pointing to release.ps1 in the build artifacts (easier done via the ...), with script arguments for our credentials (not actually used, as discussed above) -inputIoTHub1key $(kvinputIoTHub1key) -outputBlobStorage1key $(kvoutputBlobStorage1key) using the latest installed version of Powershell.
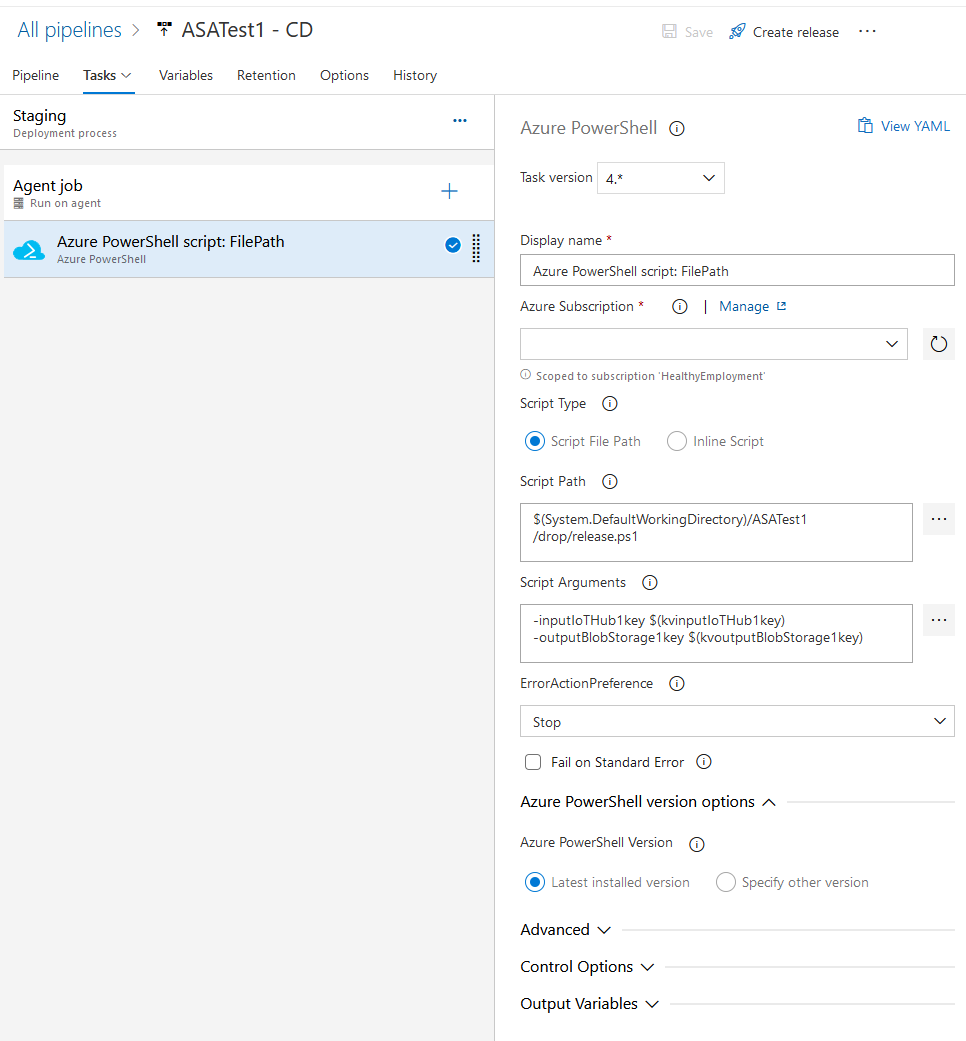
figure 5 - Screenshot of Azure DevOps: the task configured
Success
Once everything is set up, the release pipeline should be happy and ready.
We can test it that by updating our ASA query (adding a --comment for example), committing/pushing and observing how the change hands up in the query of the live job.
Of course this will trigger a restart of the job, but since we’re restarting at LastOutputEventTime we will not loose any data (but potentially generate duplicates).
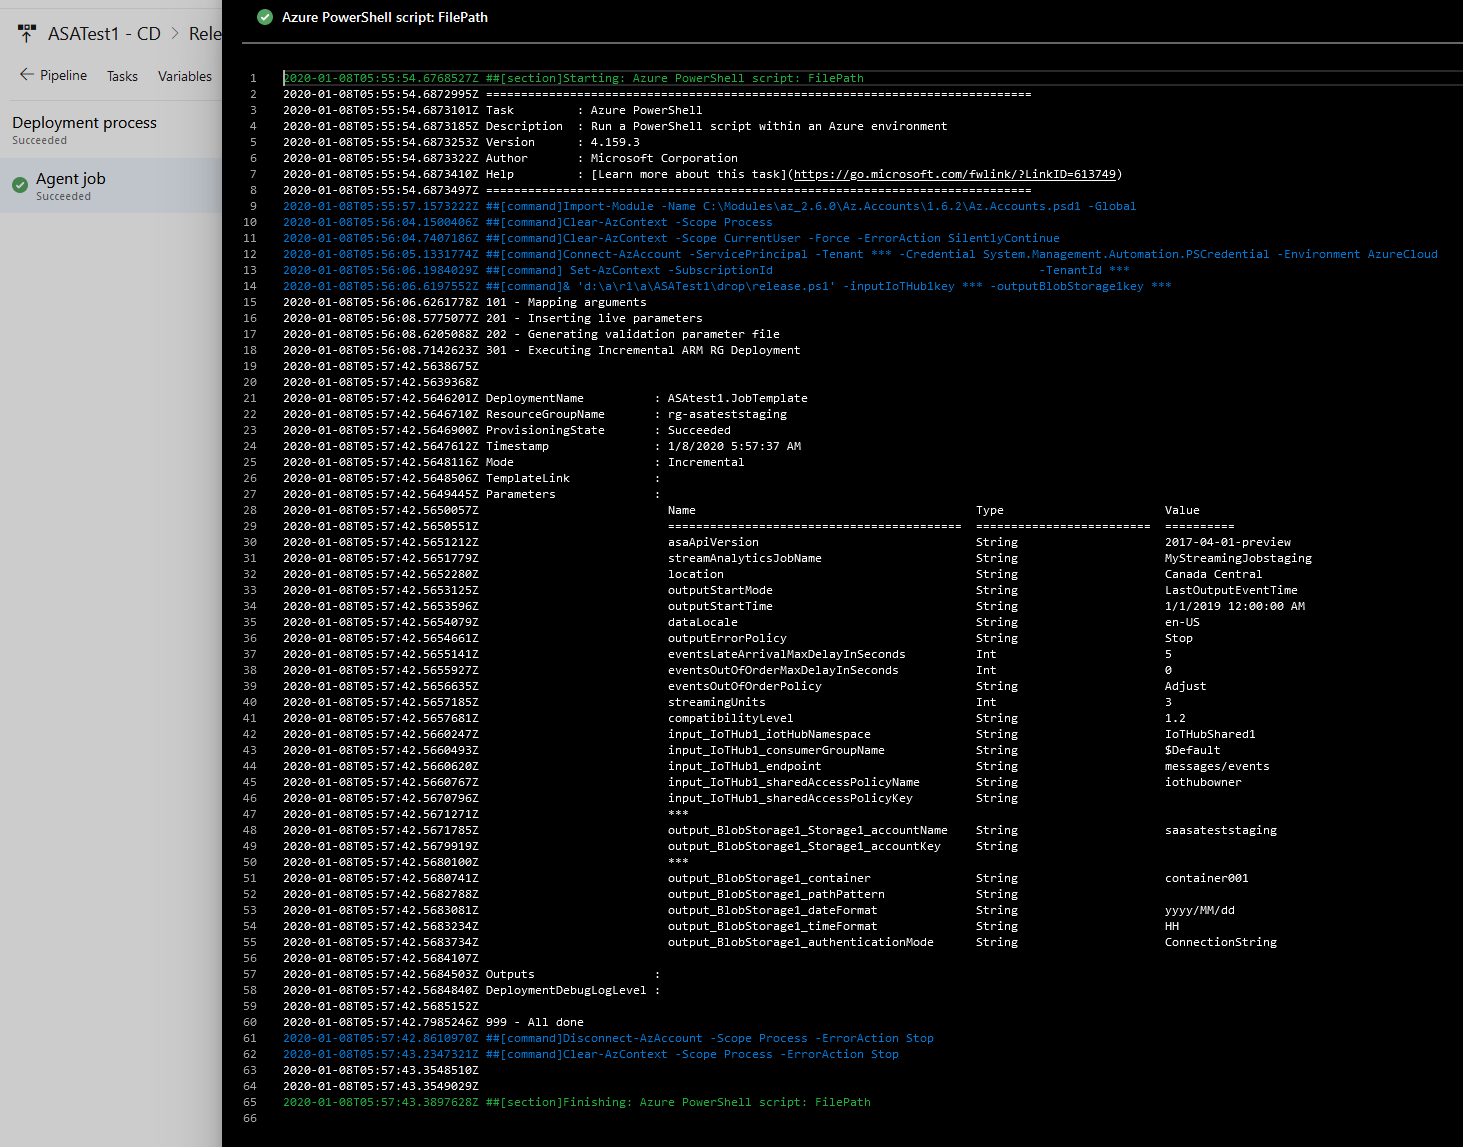
figure 6 - Screenshot of Azure DevOps: log of a successful release
A final reminder about CI/CD setups and 24/7 compute resources such as an ASA job: pushing code to the origin repository will re-start them. So if need be, let’s not forget to turn them back off, or just unplug the release pipeline as explained above. Please don’t send me your bill!
We now have continuous builds and automated deployments, let’s turn our attention to automated testing so we can finally enable proper CI/CD.
Next steps
Part 1: 100 - The story of 2 pipelinesPart 2: 101 - Local developer experiencePart 3: 102 - Provisioning scripts and live jobPart 4: 103 - Continuous buildPart 5: 104 - Automated deployment- Part 6 : 105 - Unit testing
- Part 7 : Integration testing - to be written
