Sixth article of a series on enabling modern ALM practices for an Azure Stream Analytics project - focusing on unit testing and test automation.
- Part 1 : 100 - The story of 2 pipelines
- Part 2 : 101 - Local developer experience
- Part 3 : 102 - Provisioning scripts and live job
- Part 4 : 103 - Continuous build
- Part 5 : 104 - Automated deployment
- Part 6 : 105 - Unit testing
- Part 7 : Integration testing - to be written
2020-03-31 : Edit following a major update of asa.unittest (release 1.0.2)
Context
Now that we have a continuous build pipeline and automated deployments, we should turn our attention towards test automation. These are the 3 practices that will allow us to enable proper CI/CD, a key aspect of DevOps.
To be honest, we should have started with test automation, via unit testing, before anything else. In my opinion it is the most important practice of modern ALM. But it took me a little bit of prep time to implement automated testing for ASA and write that article.
The main reason being that at the moment, unit testing is not supported natively for ASA in either VSCode or Visual Studio. This article will show us how to go around that, using a tool I built and made available on Github: asa.unittest.
It is to be noted that asa.unittest is still a work in progress. In consequence I expect this article to be updated regularly in the near future.
Introduction to asa.unittest
The github repository of asa.unittest has a README that gives us some details on what the tool does and how it works.
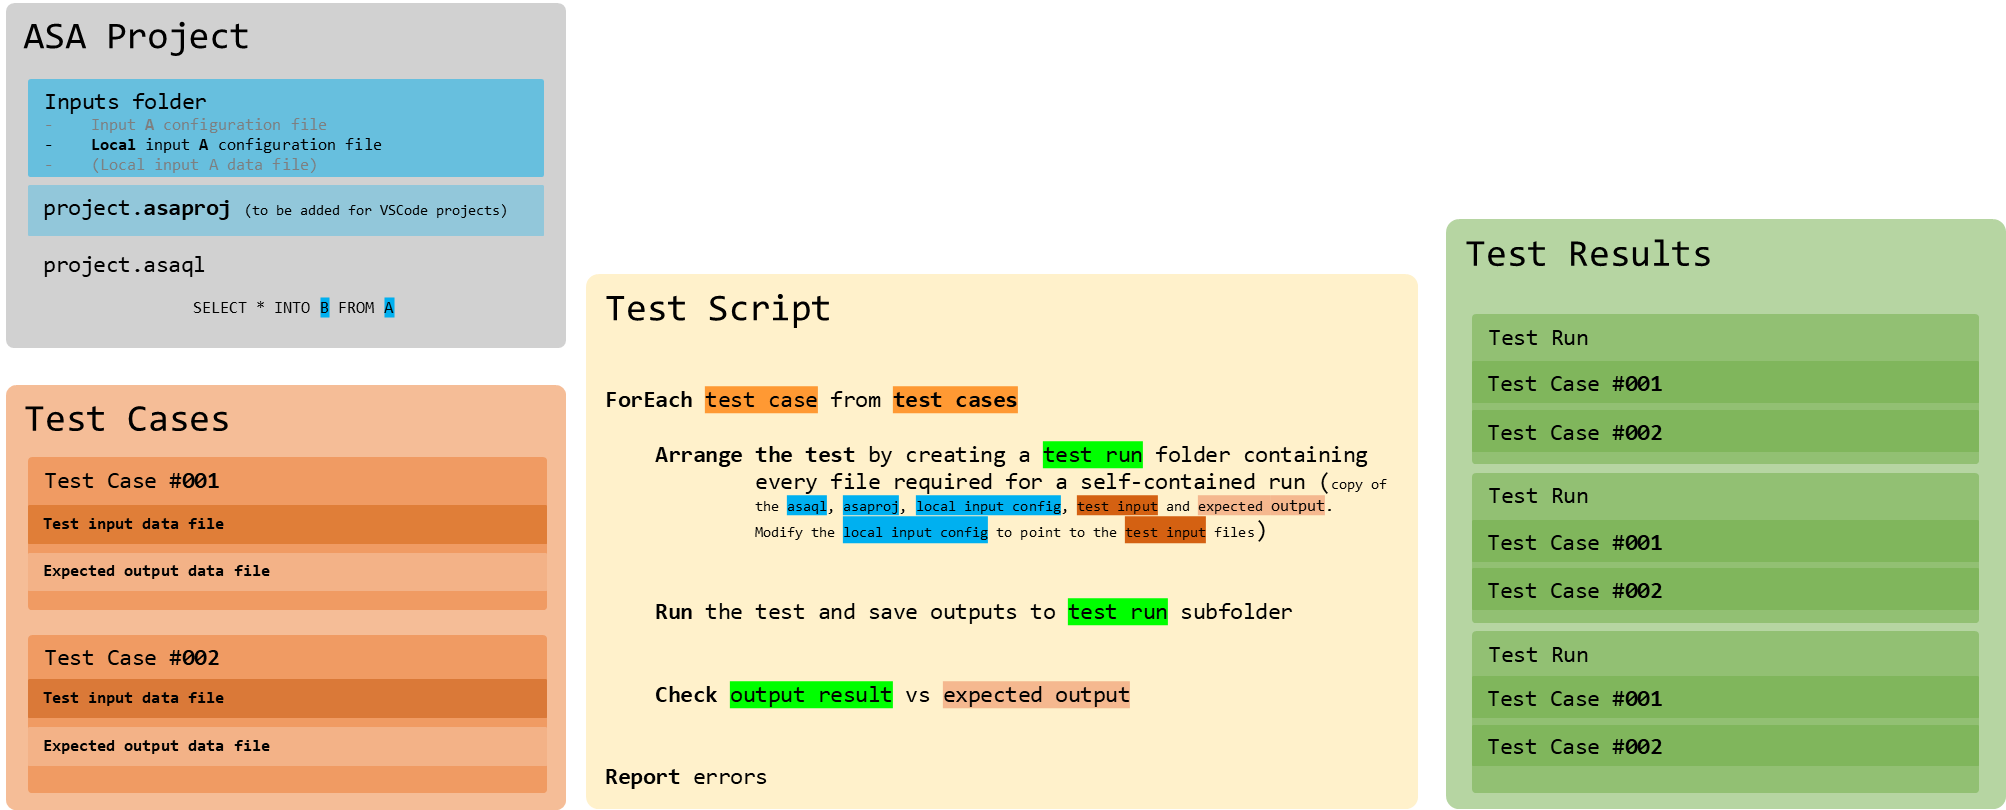
figure 2 - asa.unittest internals
The short version is that we’ll need to prepare a fixture, a fancy term for a folder structure and a couple of config files, for it to run.
But let’s not worry to much about how the tool work, and focus on getting it running in our project.
Requirements and setup
The requirements are fairly standards (PowerShell, Node/NPM, .NET Framework), but make it apparent that the tool will only work on Windows. This is due to the limited availability of the sa.exe command used under the cover to run the ASA engine programmatically.
Once the requirements are installed, we can install the tool from the PowerShell Gallery. This is done in a PowerShell host (Windows Terminal, Command Prompt, PowerShell ISE…) via:
Install-Module -Name asa.unittest
Solution folder
If it’s not already the case, we will need to create a solution folder that will contain both our existing ASA project folder and the new unit test folder. Depending on how version-control was configured, and how the build and release pipelines are setup, this can actually break a lot of things.
Let’s try to keep most of the wiring working by:
- Creating a new
ASATest1folder in our existingASATestfolder - Moving the ASA content into it : folders (Functions, Inputs, LocalRunOutputs, Outputs) and files (
asaproj.json,ASATest1.asaql,JobConfig.json) - Leaving the other folders untouched (Deploy, Provision) but moving the YAML config file in Deploy (not necessary but why not at this point)
- Creating a
ASATest1.Testsfolder that will host our test fixture
On a schema:
- ASATest <- Existing top solution folder
- ASATest1 <- New ASA project folder, we’re moving all the ASA files in there
- ASATest1.Tests <- New empty folder for the test project
- Deploy <- Existing deployment folder, now with the YAML file too
- Provision <- Existing provisioning folder
On a picture:
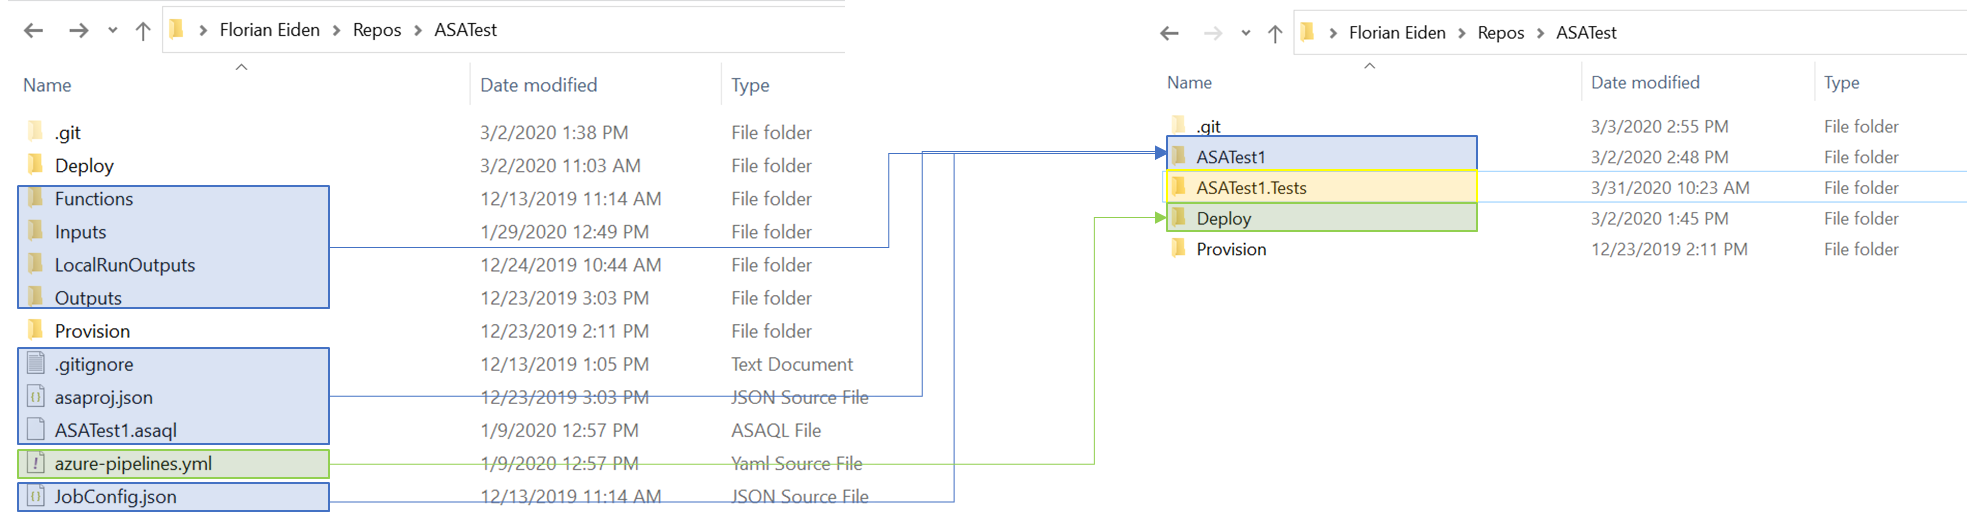
figure 3 - schema of the folder structure reworked
We should check that the ASA project is still wired properly (including the .gitignore file) by doing a local run in VSCode. We can open at the the solution folder level for that, which will also allow us to commit and push all of our changes into the Azure DevOps repo.
Pipelines
We will need to update Build.ps1 to reflect the change in folder structure. This should be simple, at the top of the file:
$scriptPath = "$sourceDirectory\$sourceProjectName.asaql"
Becomes
$scriptPath = "$sourceDirectory\$sourceProjectName\$sourceProjectName.asaql"
Note that re-reading that script, I have a strong urge to rewrite it using better PowerShell. Those hard-coded values… Maybe later…
Then in Azure DevOps, we will need to fix the yaml path of the build pipeline by going in the settings (edit mode, vertical ellipsis top right) and updating the value to deploy/azure-pipelines.yml
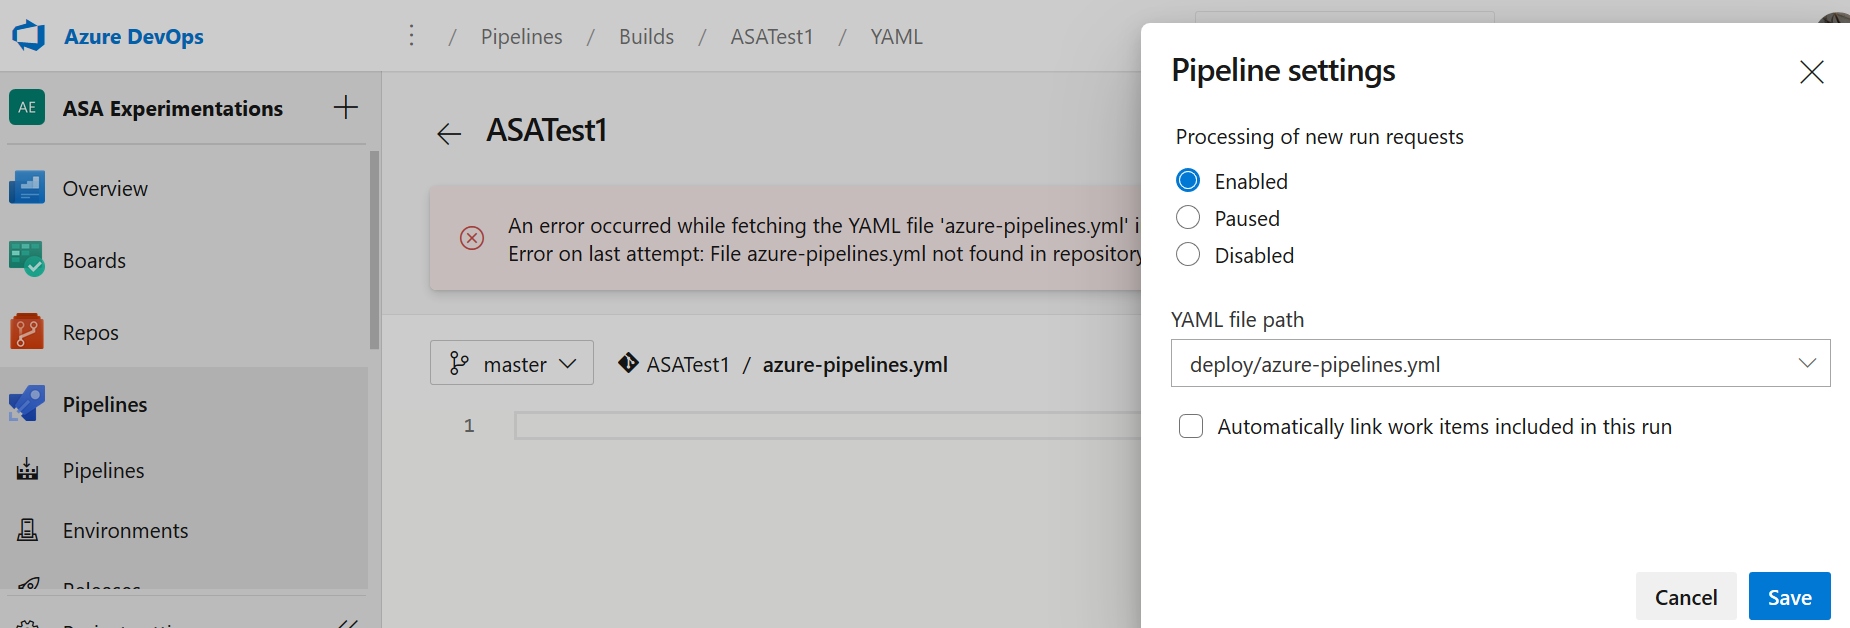
figure 4 - Azure DevOps, build pipeline screenshot : fixing the yaml path
Once fixed, we should trigger a run and check that it’s successful, down to the release.
Unittest
Finally, for the ASATest1.Tests folder, we should run the asa.unittest command that will create an empty fixture and download dependencies. In a PowerShell terminal:
New-AutProject -installPath "C:\...\ASATest1.Tests" -verbose
As usual, if we get an execution policy warning, we can just Set-ExecutionPolicy Bypass to get around it. As a reminder, the VSCode PowerShell integrated console has a weird behavior around execution policies, so it’s best to avoid it and use another Terminal instead.
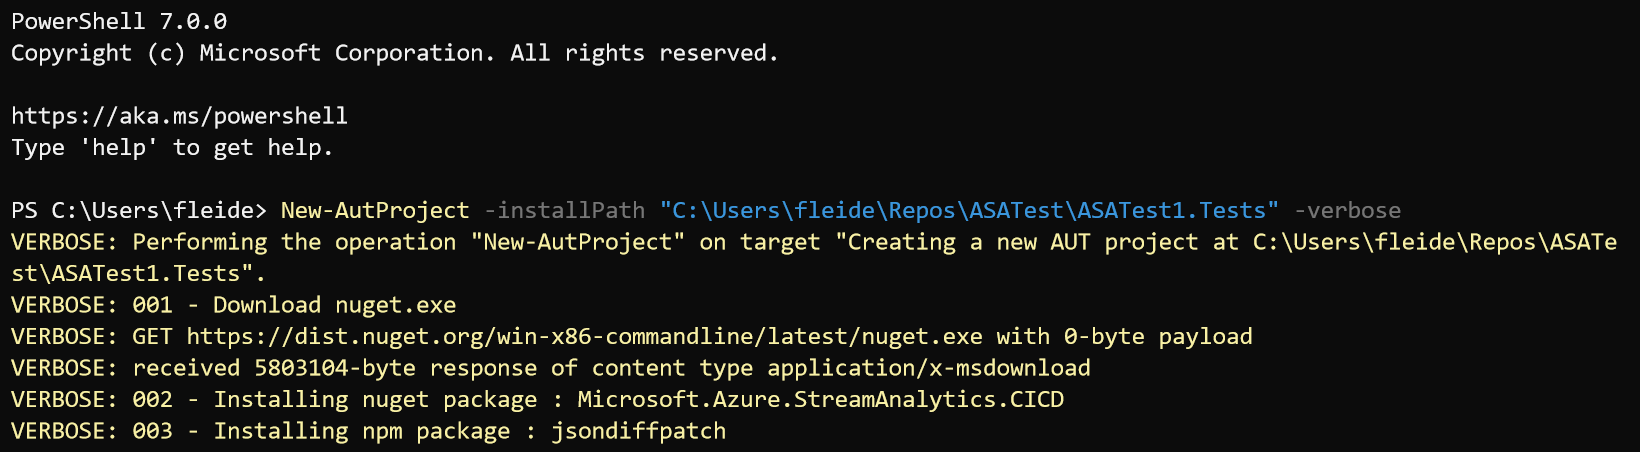
figure 5 - Windows Terminal, installing the toolset screenshot
After all that we should be ready to do some testing.
Local unit testing
First, we’ll define 2 or 3 tests to run locally. If we take a look at the content of the example folder of the asa.unittest repo for inspiration, we’ll see that a test case is made of input and output files named according to a convention. Let’s not repeat the full doc here but instead build the following cases for the current query to be tested:
SELECT
    deviceId,
    avg(temperature) as avg_temperature_t5,
    COUNT(*) as cnt_records_t5,
    System.Timestamp() AS EventAggregatedTime
INTO [BlobStorage1]
FROM [IoTHub1] TIMESTAMP BY EventProcessedUtcTime
GROUP BY deviceId, TumblingWindow(second,5)
We can use live extracts to generate test input data. For test output data, the best is to leverage the output files in the LocalRunOutputs folder, located in the ASA project after a successful local run. Note that these files may be generated in a line separated format which is not supported by the test runner, see the doc above on how to address that.
Let’s add the following 6 files in the ASATest1.Tests\1_assert folder. That’s where the fixture is expecting them to be:
- 001~Input~IoTHub1~Nominal.json
This is the nominal use case: 3 correct messages in, separated by more than 5 seconds to get 2 messages out (the query has a 5 second tumbling window).
[
  {"messageId":225,"deviceId":"Raspberry Pi Web Client","temperature":28.836692209941976,"humidity":61.320061764993063,"EventProcessedUtcTime":"2019-11-09T05:55:09.9263983Z","PartitionId":0,"EventEnqueuedUtcTime":"2019-11-09T05:53:51.3740000Z","IoTHub":{"MessageId":null,"CorrelationId":null,"ConnectionDeviceId":"MyASAIoTDevice001","ConnectionDeviceGenerationId":"637088714355240672","EnqueuedTime":"2019-11-09T05:53:51.0000000","StreamId":null}}
  ,
  {"messageId":228,"deviceId":"Raspberry Pi Web Client","temperature":27.794169792332852,"humidity":70.980360543970193,"EventProcessedUtcTime":"2019-11-09T05:55:10.9263983Z","PartitionId":0,"EventEnqueuedUtcTime":"2019-11-09T05:53:57.7540000Z","IoTHub":{"MessageId":null,"CorrelationId":null,"ConnectionDeviceId":"MyASAIoTDevice001","ConnectionDeviceGenerationId":"637088714355240672","EnqueuedTime":"2019-11-09T05:53:57.0000000","StreamId":null}}
,
  {"messageId":229,"deviceId":"Raspberry Pi Web Client","temperature":29.567696660676628,"humidity":79.635582091098271,"EventProcessedUtcTime":"2019-11-09T05:55:12.9263983Z","PartitionId":0,"EventEnqueuedUtcTime":"2019-11-09T05:53:59.8960000Z","IoTHub":{"MessageId":null,"CorrelationId":null,"ConnectionDeviceId":"MyASAIoTDevice001","ConnectionDeviceGenerationId":"637088714355240672","EnqueuedTime":"2019-11-09T05:53:59.0000000","StreamId":null}}
]
- 001~Output~BlobStorage1~Nominal.json
[
     {"deviceId":"Raspberry Pi Web Client","avg_temperature_t5":28.836692209941976,"cnt_records_t5":1,"EventAggregatedTime":"2019-11-09T05:55:10.0000000Z"}
    ,{"deviceId":"Raspberry Pi Web Client","avg_temperature_t5":28.680933226504742,"cnt_records_t5":2,"EventAggregatedTime":"2019-11-09T05:55:15.0000000Z"}
]
- 002~Input~IoTHub1~NullValue.json
Highlighting only the differences from nominal: we set the temperature to null for message 229.
[
  {"messageId":225,...}
  ,
  {"messageId":228,...}
,
  {"messageId":229,...,"temperature":null,...}
]
- 002~Output~BlobStorage1~NullValue.json
[
     {"deviceId":"Raspberry Pi Web Client","avg_temperature_t5":28.836692209941976,"cnt_records_t5":1,"EventAggregatedTime":"2019-11-09T05:55:10.0000000Z"}
    ,{"deviceId":"Raspberry Pi Web Client","avg_temperature_t5":27.794169792332852,"cnt_records_t5":2,"EventAggregatedTime":"2019-11-09T05:55:15.0000000Z"}
]
- 003~Input~IoTHub1~MissingValue.json
Here we completely remove the temperature field from message 229 and check the impact.
- 003~Output~BlobStorage1~MissingValue.json
[
     {"deviceId":"Raspberry Pi Web Client","avg_temperature_t5":28.836692209941976,"cnt_records_t5":1,"EventAggregatedTime":"2019-11-09T05:55:10.0000000Z"}
    ,{"deviceId":"Raspberry Pi Web Client","avg_temperature_t5":27.794169792332852,"cnt_records_t5":2,"EventAggregatedTime":"2019-11-09T05:55:15.0000000Z"}
]
Once this is set up, we can use the test runner to verify that when the query is applied on an input test set, it generates the expected output, matching the output provided. The test runner, Start-AutRun, will need the project name (ASATest1 here) and the solution folder path.
In a PowerShell terminal:
Start-AutRun -asaProjectName "ASATest1" -solutionPath "C:\...\ASATest"-verbose
If we had decided on something different than ASATest1.Tests for the name of the folder hosting our tests, we could have used the parameter unittestFolder to override the default mapping.
We may have a network access warning from Windows at that point, from something called SA. It’s the same warning we get when running local jobs in VSCode or Visual Studio. SA is actually sa.exe, the executable running the ASA engine locally.
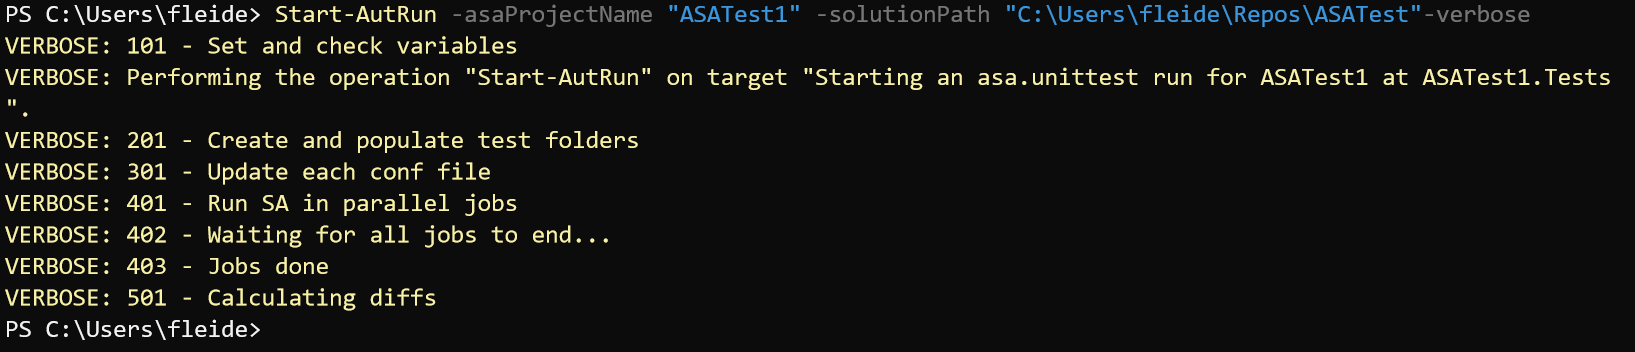
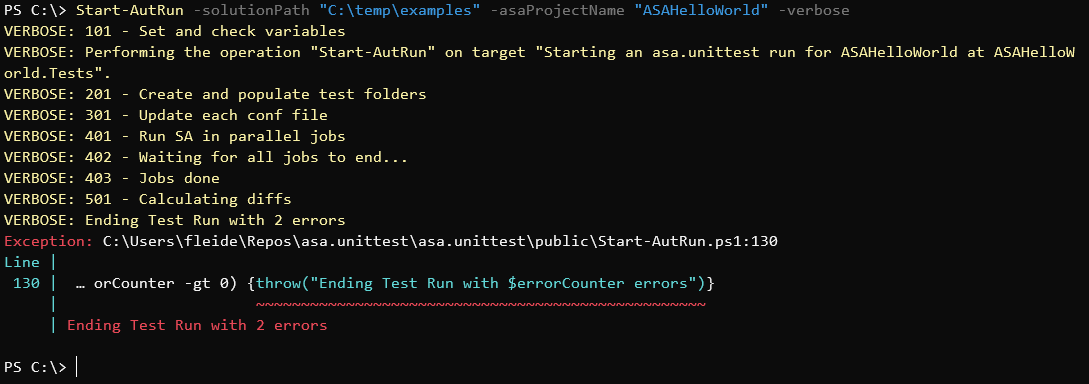
figure 6 - Windows Terminal, successful test run
No output means that the tests run successfully. We can have a look at the output folder (\ASATest1.Tests\3_assert) to see the details of the run.
Now is a good time to test messing with the query, or the input/output test files, to see how the test runner behave.
Testing in the build pipeline
Unit tests should be run after compilation, during the build phase, to ensure the quality of the build.
In VSCode, we need to edit build.ps1 so that it installs the module from the gallery (Install-Module), downloads the dependencies (New-AutProject) and then calls test runner (Start-AutRun).
We also need to update the unittestFolder parameter at the top of the script to new value : ASATest1.Tests.
# Step 0: map arguments and variables

...

$unittestFolder = "ASATest1.Tests" #former value was "unittest"

...

# Step 4: run unit tests

write-host "401 - Installing unit test dependencies"

Install-Module -Name asa.unittest -Force #Unattended installs
New-AutProject -installPath "$sourceDirectory\$unittestFolder" -verbose

write-host "402 - Running unit tests"

Start-AutRun -asaProjectName $sourceProjectName -solutionPath $sourceDirectory -verbose

# Step 5: move files to staging folder

...
After committing and pushing to Azure DevOps, we’ll have our unit tests running in our build pipeline:
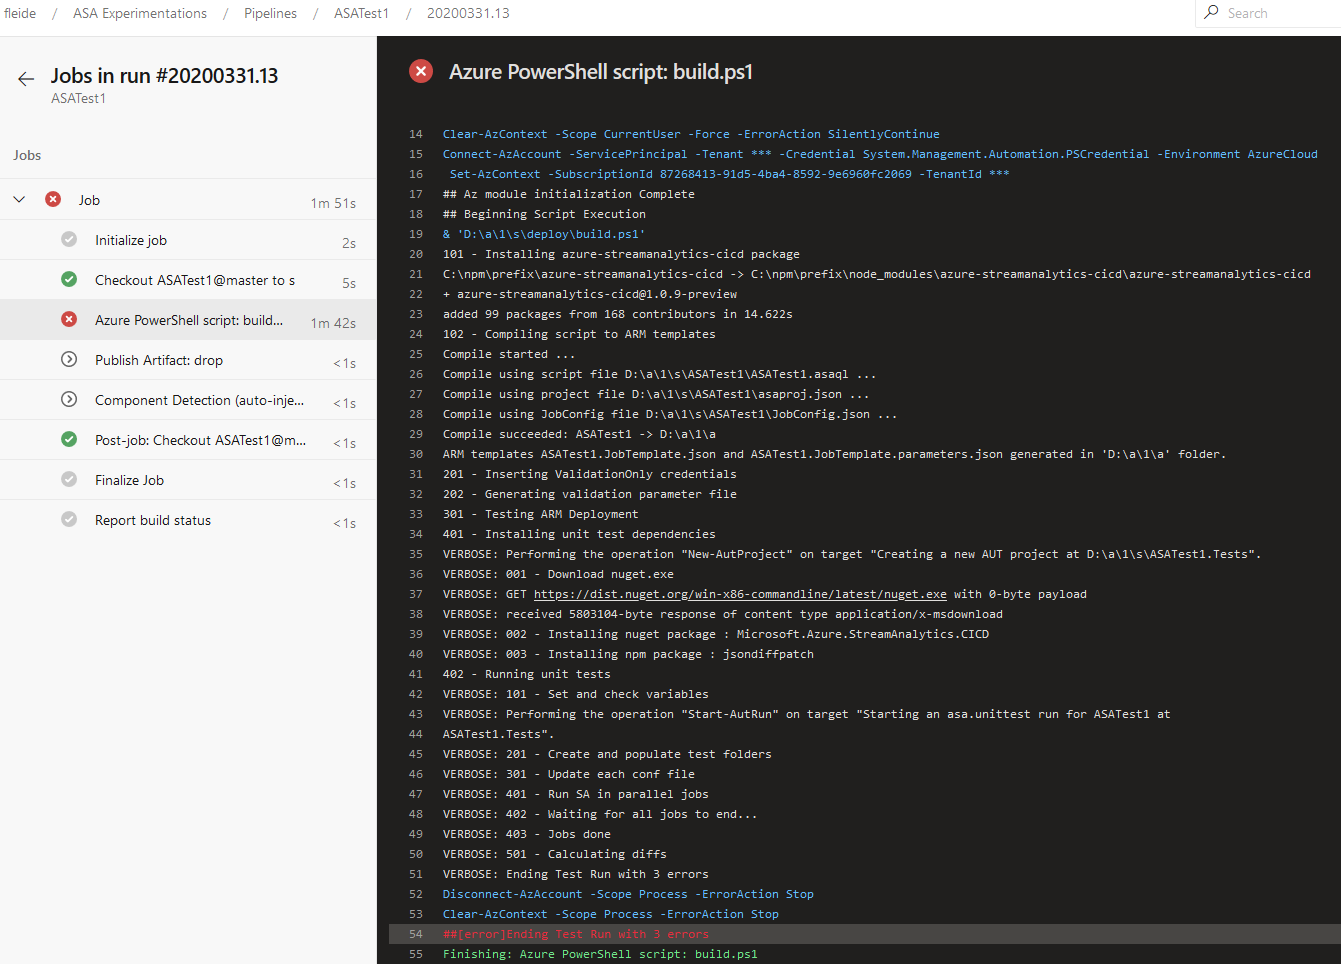
figure 7 - Azure DevOps Build Pipeline screenshot - failed job thanks to tests not passing
Above we can observe success in failure, as I intentionally left a failing test case in my 1_assert folder to check that my build would indeed fail.
When I fix my test case, my build pass and a deployment is triggered:

figure 8 - Azure DevOps Build Pipeline screenshot - successful job thanks to tests passing
Success
First, let’s congratulate ourselves for making it this far. Simply by adopting these 3 practices - continuous build, automated deployment and unit testing - we’ve increased the quality of our delivery by an order of magnitude (see Accelerate for the real metrics on the topic). This was simple but not easy, but also this was just a beginning.
I’m sure that if you’ve been through the motions, you’ve seen a huge number of opportunities to increase the efficiency of the process (I know I did!). Perfect! A good engineering outfit should maintain a good balance of production vs production capacity investments (habit 7). So let’s put those in your backlog (or add refactor time in your workload mix, or whatever works for you).
I’ll personally try to invest time in polishing the process, and I’m also hopeful that the ASA product team will remediate the current gap at some point in the near future.
Next steps
Part 1: 100 - The story of 2 pipelinesPart 2: 101 - Local developer experiencePart 3: 102 - Provisioning scripts and live jobPart 4: 103 - Continuous buildPart 5: 104 - Automated deploymentPart 6: 105 - Unit testing- Part 7 : Integration testing - to be written
