Fourth article of a series on enabling modern ALM practices for an Azure Stream Analytics project - focusing on continuous build in Azure DevOps.
- Part 1 : 100 - The story of 2 pipelines
- Part 2 : 101 - Local developer experience
- Part 3 : 102 - Provisioning scripts and live job
- Part 4 : 103 - Continuous build
- Part 5 : 104 - Automated deployment
- Part 6 : 105 - Unit testing
- Part 7 : Integration testing - to be written
Context
Now that we have a job that can run live (see 102, with its data source and sink, we can start thinking CI/CD.
For a bit of background:
CI is for Continuous Integration, which starts with the practice of continuously building our application, every time the code is changed. Once continuous builds happen, we can decide to build at the master branch level, after changes are merged. When working as a team on a single scope of work, that will ensure that our entire code base is always in a happy place as we work collaboratively on it. Integration happens when we deploy that build in a production-like environment and add automated testing.
CD is for Continuous Deployment, which is the practice of deploying our code all the way to production automatically, once the CI has succeeded (this is a bit more complicated than that, but let’s go with that).
To enable both practices, we’ll need continuous builds on code changes, continuous deployments on successful builds and automated testing (packaged unit tests in build, integration tests in deployment) to check that what we’re delivering is valid. This article will cover the first requirement.
Since we’re already using Azure DevOps for repos, this will be done in Azure Pipelines, in the Build section. Triggering our builds should be the Git push commands we make to our central repository.
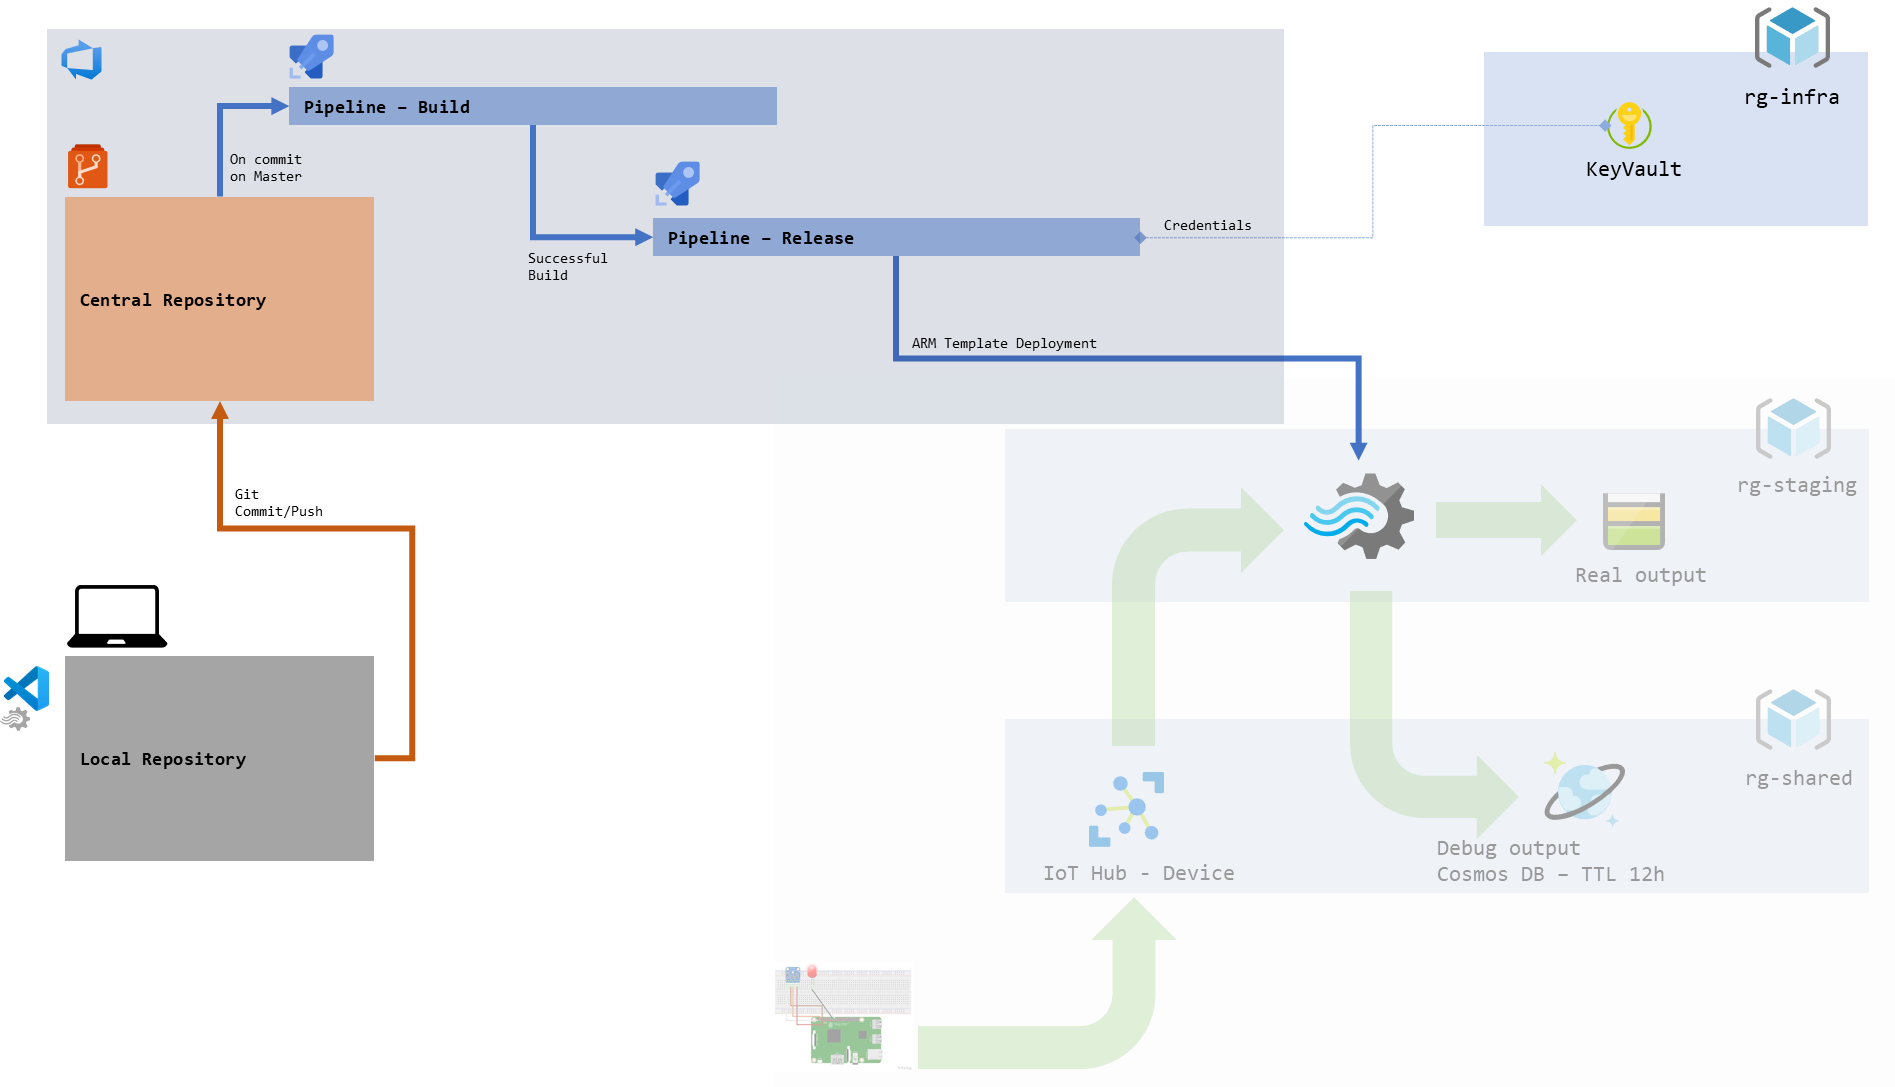
figure 1 - Schema of our future development pipeline
If we were using Visual Studio (and not VSCode), we could use the tutorial from the official documentation on how to use a specific nuget package in addition to msbuild to set up that pipeline. We’re using VSCode, so let’s find another way.
It is to be noted that I’m not an expert of Azure DevOps, so any feedback on how to do things in a more elegant way is appreciated.
Build pipeline
In Azure DevOps, just under Repos we can find Pipelines. The first thing we’ll create is a new build pipeline, linked to our Azure Repos repository. We will go with a YAML pipeline instead of a “classic” one for two reasons. YAML pipelines are the most recent ones, the documentation is fresher and the newest features are shipped there. Also it may be a bit foreign at first, not having a UI as prominent to help, but it means that our build definition will sit in a file (.yml) that we can host in our repo alongside the rest of the assets of our project. This is nice.
Let’s pick a Starter Pipeline, and we should be greeted by something looking like that:
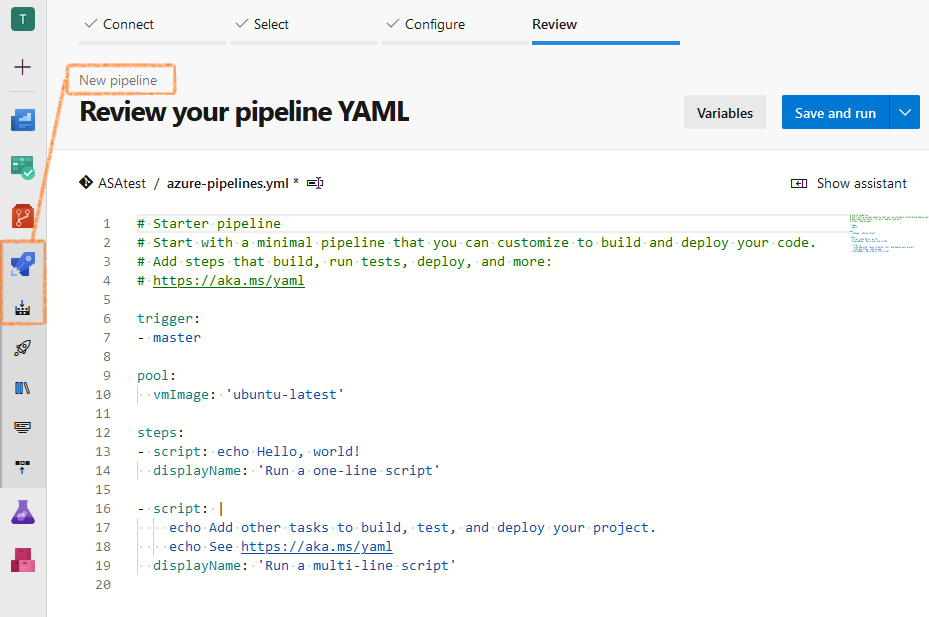
figure 2 - Screenshot of Azure DevOps: starter YAML pipeline
We can save the YAML file back into our repo by clicking Save or Save and run (no real difference on a starter script). It should then be located in the root folder of our repository.
We want to move that file into the deploy folder of our project. Since we should avoid makings changes to our origin repo directly, let’s first head back to VSCode and sync the repo so the YAML definition get downloaded locally. Now in VSCode we can move the YAML file into our deploy folder, commit the change and finally push it back to the origin.
This should make the build pipeline unhappy (the YAML file can’t be found anymore!). Which is easy to correct in the settings, under YAML file path:
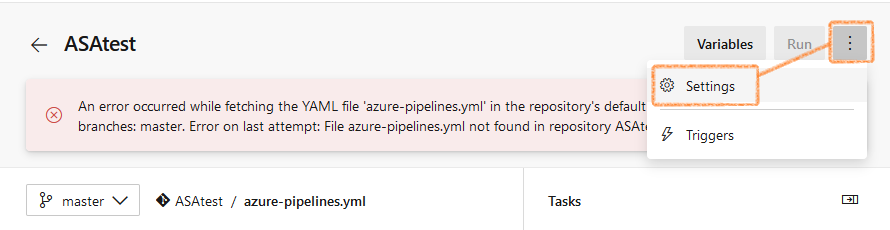
figure 3 - Screenshot of Azure DevOps: YAML pipeline being unhappy
Now let’s take some time to think about what steps should go in our build.
Steps
The first step in the build process should be the generation of our ARM template files from our project assets. Until now we have used VSCode to do that (via ASA: Compile scripts), we will look into the npm package that allows to script that instead.
In the second step we should validate those templates, to make sure they are correct - we have options to do just that in script (PS, CLI).
In the third step, we should publish those ARM template files to the release pipeline so they can be deployed against our staging environment (to be done in the next article).

figure 4 - Schema of the 3 build steps
Easy!
ASA CI/CD npm package
The ASA engineering team has released a npm package that does exactly what the ASA: Compile scripts command do in VSCode, but in command line instead.
We remember that npm is a software registry, aka a package manager, supporting the node.js ecosystem. So to get our package to work in an environment we’ll need to install node.js first, which comes with the npm command line interface.
It’s easy to check if both node and npm are installed properly, either in a PowerShell or Bash terminal:
node -v
npm -v
For Windows 10 users, node and npm can be installed in Windows, the WSL, or both. Each is a different instance with potentially a different version number and different packages available. Something to remember just in case.
With npm installed, we can install our ASA CI/CD package by going:
npm install -g azure-streamanalytics-cicd
The -g switch makes the installation global, which is fitting for a tool to be used across projects. That way we should be able to use the package from any location:
PS C:\> azure-streamanalytics-cicd
This package supports the CI/CD of Stream Analytics Visual Studio Code projects.
Sample usage: azure-streamanalytics-cicd build -scriptPath <scriptFullPath> [-outputPath <outputPath>]
Finally, if it’s good to install that package locally for local development and testing purposes, we already need to think about how it’s going to be managed in Azure Pipelines. The good thing is both Node.js and npm are part of every Microsoft-hosted agent templates (the VMs that will execute our build for us). So we’ll just need that last global installation command to get going. Let’s see how to do that.
build.ps1
Building our project will need to be scripted.
As we’ve seen above, generating the ARM templates files from our project files requires to run the npm CLI (to install and run the package). We remember that those ARM template files are generated with null fields (credentials and secrets) that have to be updated for testing. This is done easily in a script. There is a UI for that in Azure Pipelines (ARM Create/Update Resource Group task) that works great when the ARM templates are in the repo, less so when we generate them on the fly. After that we have to use either PowerShell or the Azure CLI to test those templates via their Azure module.
For all of those steps we could use any scripting language, including PowerShell or the Azure CLI. Those two are the main candidates here, as both are first class citizens in Azure DevOps.
We will use PowerShell in this article, mainly because I was having fun with it quite frankly. I’m not to concerned about that choice, since I know that the people that are going to be unhappy about it are also the ones capable of re-writing the script in another language. To be noted that we’re using PowerShell Core which is cross platform, if that was the blocker.
Let’s have a look at the script and discuss it after. In our deploy folder, let’s add a build.ps1 file containing :
# Step 0: map arguments and variables

$sourceProjectName = "ASATest1"
$targetResourceGroup = ${ENV:VG-RESOURCEGROUP}

$sourceDirectory = $ENV:BUILD_SOURCESDIRECTORY
$stagingDirectory = $ENV:BUILD_ARTIFACTSTAGINGDIRECTORY

$scriptPath = "$sourceDirectory\$sourceProjectName.asaql"
$templatePath = "$stagingDirectory\$sourceProjectName.JobTemplate.json"
$generatedParametersPath = "$stagingDirectory\$sourceProjectName.JobTemplate.parameters.json"
$validationParametersPath = "$stagingDirectory\$sourceProjectName.JobTemplate.parameters.validation.json"

# Step 1: generate ARM template files

## First, install the required package
write-host "101 - Installing azure-streamanalytics-cicd package"
npm install -g azure-streamanalytics-cicd

## Then, generates the templates from source
write-host "102 - Compiling script to ARM templates"
azure-streamanalytics-cicd build -scriptPath $scriptPath -outputPath $stagingDirectory

# Step 2: update the files to remove null credentials

write-host "201 - Inserting ValidationOnly credentials"
$parametersData = Get-Content $generatedParametersPath | ConvertFrom-Json

#Hardcoded parameters, this can be scripted instead but not sure of the ROI yet
$parametersData.parameters.Input_IoTHub1_sharedAccessPolicyKey.value = "ValidationOnly"
$parametersData.parameters.Output_BlobStorage1_Storage1_accountKey.value = "ValidationOnly"

write-host "202 - Generating validation parameter file"
$parametersData | ConvertTo-Json | Out-File $validationParametersPath

# Step 3: test the deployment

write-host "301 - Testing ARM Deployment"

$testResult = Test-AzResourceGroupDeployment `
  -ResourceGroupName $targetResourceGroup `
  -TemplateFile $templatePath `
  -TemplateParameterFile $validationParametersPath `
  -Mode Incremental

if ($testResult) {throw($testResult.Message)}

# Step 4: move files to staging folder

write-host "402 - Moving release script to Staging Dir"
Move-item "$sourceDirectory\deploy\release.ps1" $stagingDirectory

# Step 9 : done
write-host "999 - All done"
This script will require an environment variable: our target resource group (the ARM validation is done against a Resource Group : rg-asateststaging). That variable can either be created at the build pipeline level (top right, variables), or in a variable group (Library under Builds and Releases on the right) which allow it to be shared across pipelines and linked to a key vault. We’ll use a variable group for the first reason, let’s name it StagingVariableGroup, and the required variable vg-ResourceGroup. Those external variables are made available in the build agent via environment variables, the first line in the script above maps that to an internal variable (for convenience sake).
In Step 1 we install our npm package globally, and use it to generate the ARM template files. We will grab our input files from the BUILD_SOURCESDIRECTORY folder, where Azure Pipelines will make our repo available for us. We will generate our templates in the BUILD_ARTIFACTSTAGINGDIRECTORY folder, where the future release pipeline will expect them to be.
In Step 2 we will replace our null parameters (credentials and secrets) by a meaningless value to pass validation (via some PowerShell cleverness) The validation step doesn’t actually check that the credentials are correct, just that they are not null. We could load the real ones already, but I wanted to delay that as much as possible and avoid playing with actual credentials in the build environment. I have a feeling it’s an unwarranted concern, but I don’t have the time to do my due diligence.
In Step 3 we will invoke Test-AzResourceGroupDeployment to test our templates, and throw an error if the test fails. We want the whole build to fail if the test fails.
In Step 4 we move our release script to the staging directory - but that’s a spoiler, we’ll look into it in the next article. We may need to add an empty release.ps1 file in the deploy folder if that step triggers an error, but it shouldn’t.
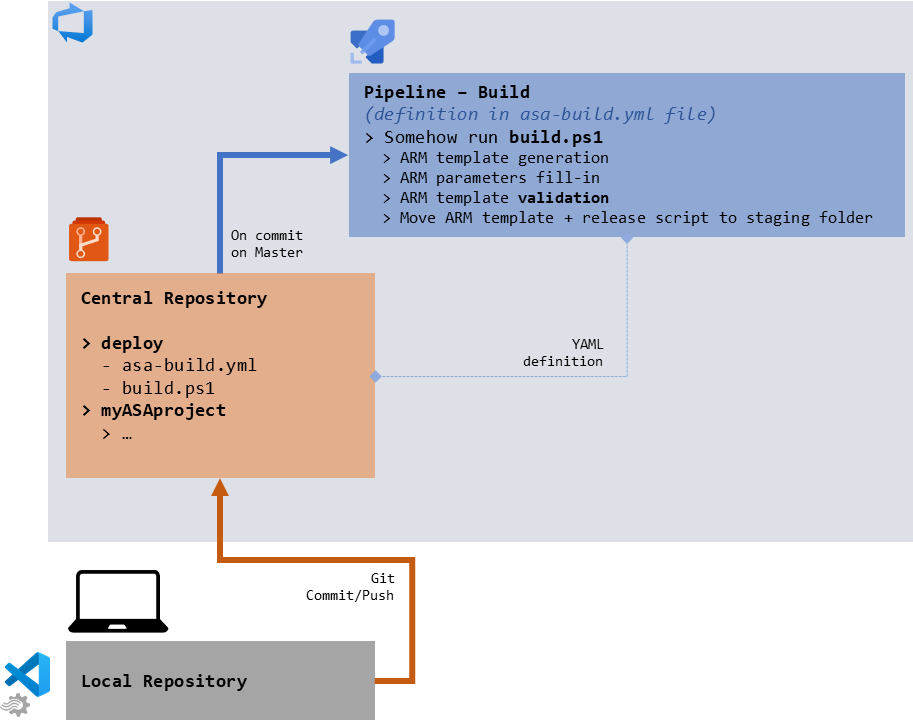
figure 5 - Updated schema of the development pipeline
YAML
Now that we have the main script written, we need to update our YAML file to actually execute it:
trigger:
- master

pool:
  vmImage: 'windows-latest'

variables:
- group: StagingVariableGroup

steps:

- task: AzurePowerShell@4
  displayName: 'Azure PowerShell script: build.ps1'
  inputs:
    azureSubscription: 'my subscription name(...)'
    ScriptPath: deploy/build.ps1
    FailOnStandardError: true
    azurePowerShellVersion: LatestVersion

- task: PublishBuildArtifacts@1
  displayName: 'Publish Artifact: drop'
This one is straightforward. We trigger the build on a commit on the master branch. We use a windows agent, of the latest version. We will use the variables in the StagingVariableGroup variable group (the one we need in the PowerShell script above), and we’ll execute 2 steps (in order of declaration, the @ at the end of their name is their version number): running our script, then publishing our artifacts. That last one just means that whatever exists in the BUILD_ARTIFACTSTAGINGDIRECTORY will be made available to whatever pipeline comes after this one - right now, none.
If we just update our YAML file in VSCode, commit and push that to our repo, the build pipeline should raise an issue looking a bit like that:
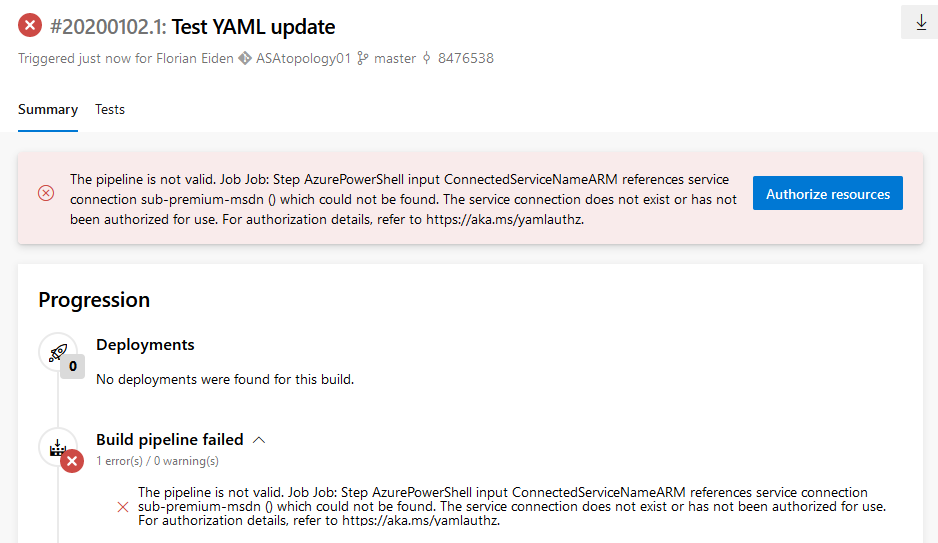
figure 6 - Screenshot of Azure DevOps: connection error in the build setup
That error message makes sense: we need to update the Azure subscription name to a real one. To do that, we need to get back in edit mode in Azure DevOps Pipelines, use the Settings link just above our step in the YAML editor, and use the wizard to pick the subscription we want to target.
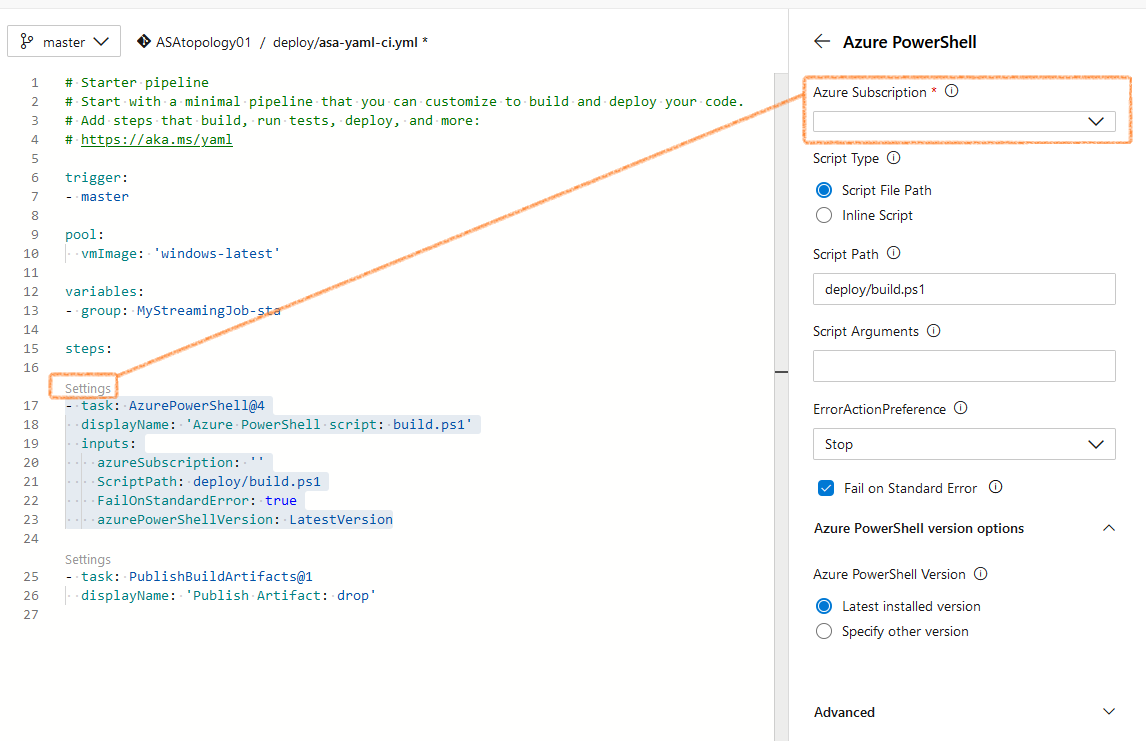
figure 7 - Screenshot of Azure DevOps: fixing the connection error
Which should bring us to:
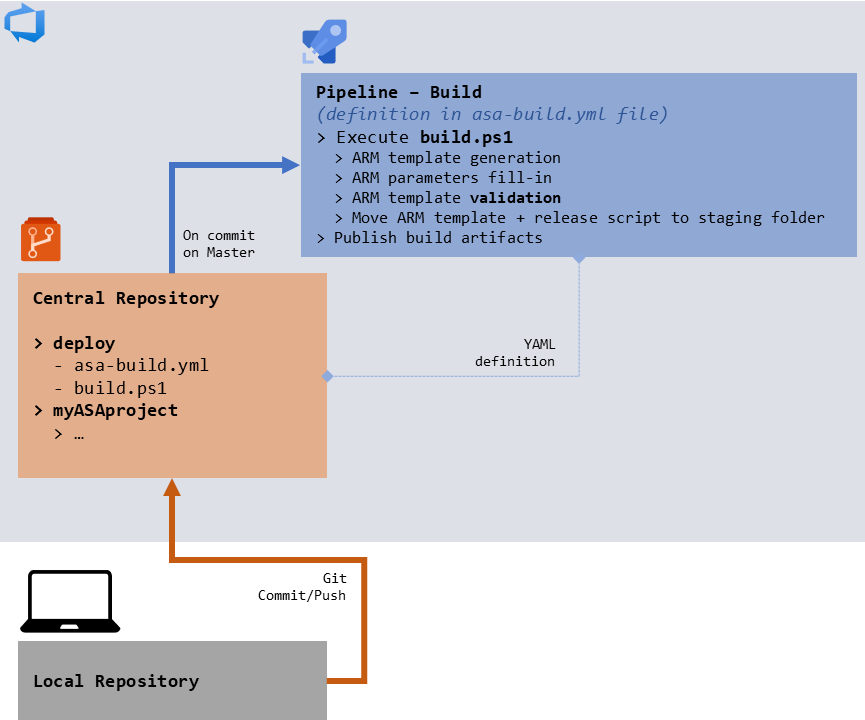
figure 8 - Schema of the final build workflow
Success
Once this is done, and if all the wiring is done properly (variable group with a variable that holds the resource group name made available to the build script, hard-coded parameters and file names changed in the script, Azure subscription fixed in the YAML), our build should succeed.
Now what happens when we commit and push to master, is that the build.ps1 script is executed, ARM template files are generated from our project files, tested, and published so our future release pipeline will be able to run them. Awesome!
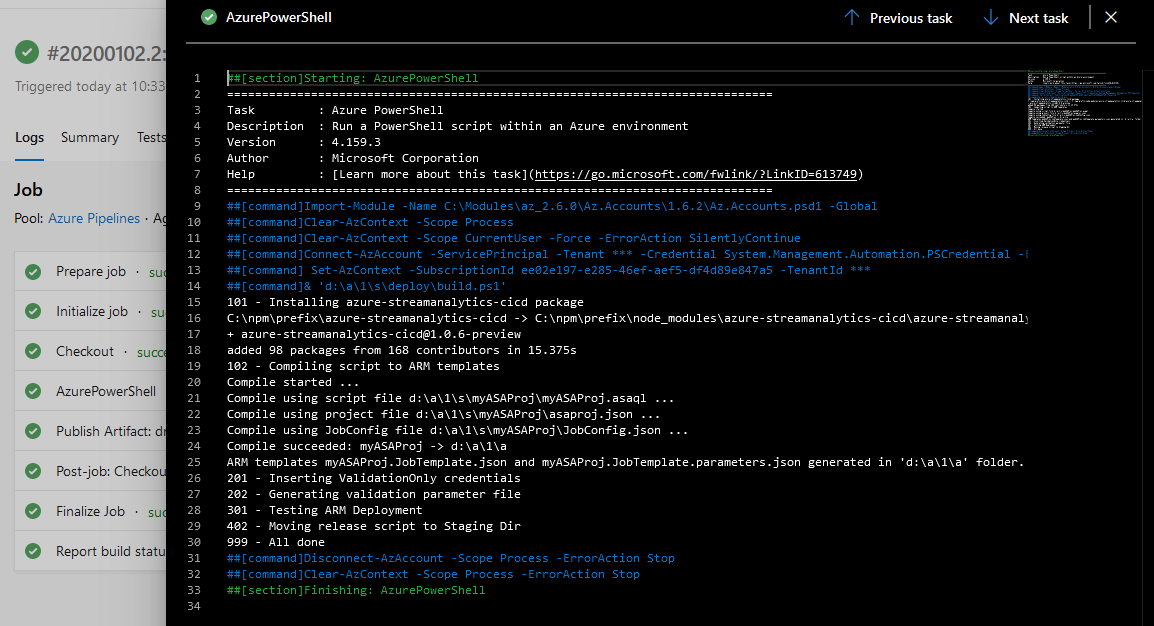
figure 9 - Screenshot of Azure DevOps: log of a successful build
Next steps
Part 1: 100 - The story of 2 pipelinesPart 2: 101 - Local developer experiencePart 3: 102 - Provisioning scripts and live jobPart 4: 103 - Continuous build- Part 5 : 104 - Automated deployment
- Part 6 : 105 - Unit testing
- Part 7 : Integration testing - to be written
