Third article of a series on enabling modern ALM practices for an Azure Stream Analytics project - focusing on provisioning.
- Part 1 : 100 - The story of 2 pipelines
- Part 2 : 101 - Local developer experience
- Part 3 : 102 - Provisioning scripts and live job
- Part 4 : 103 - Continuous build
- Part 5 : 104 - Automated deployment
- Part 6 : 105 - Unit testing
- Part 7 : Integration testing - to be written
Context
We are continuing the work of enabling modern ALM practices for our ASA project.
This time we aim to work with a live streaming job, building on the local one we already have, so we give ourselves the opportunity to feel the pain of deploying running jobs. For that we will need first to configure a live data source, then to provision the required resources in Azure for hosting our job, and finally to deploy it via VSCode. That last step is a temporary process, as in the next articles we will build the release pipeline that will move our code to Azure automatically.
This time we will need an Azure subscription, good thing it’s easy to get a free one (credit card required, but never used).
The ASA job we will use is the one offered in the quick-start tutorial of the official documentation. Events are generated in the Raspberry Pi Azure IoT Online simulator (it’s a simulator, no need for a physical device), pushed to an IoT Hub, ingested by the ASA job and output to a blob store (storage account container).
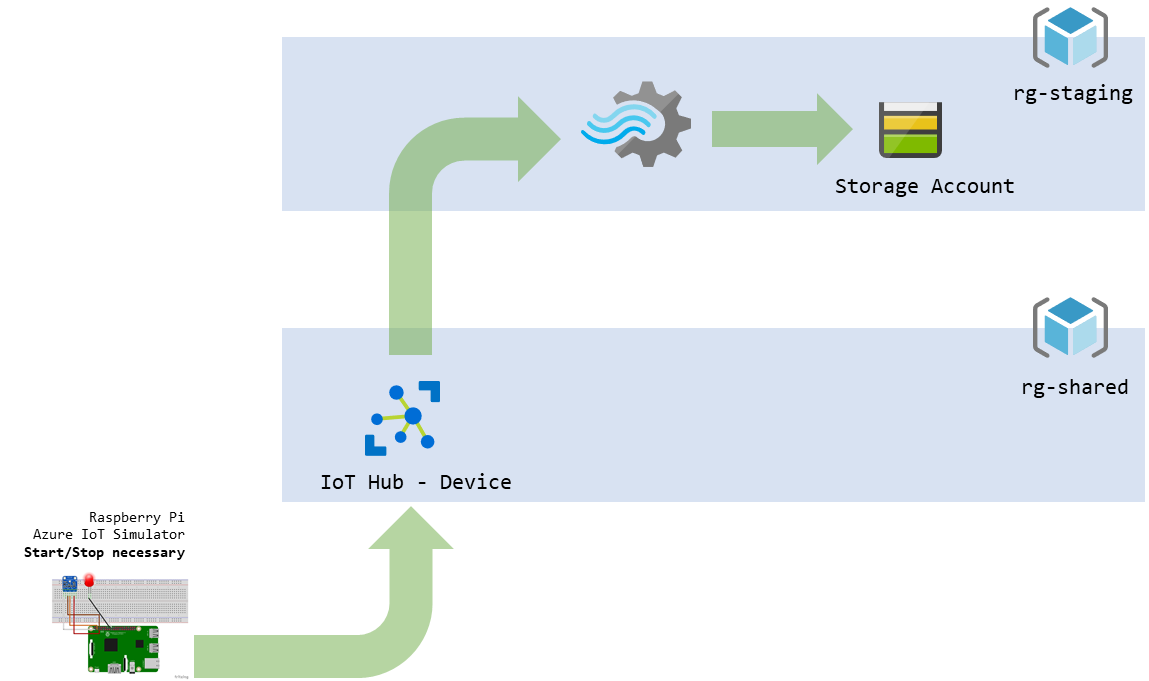
figure 1 - Schema of our future data pipeline
Let’s get started!
Live data source
The first part to build is the data source. It’s good practice not to consider that resource as part of our project: it could be used by another ASA job, or any other consumer application. That’s why we’ll put it in a separate resource group: rg-shared. Since it’s not part of our project, we can spare ourselves the scripting and just use the UI:
- In the Azure portal, let’s create a new resource group to hold our shared assets:
rg-shared - We will create the IoT Hub following the steps 1 to 8 replacing the resource group by our
rg-shared - Then we can start the IoT simulator by following this step. The IoT hub will store these events for us while we setup our job.
Once this is done, we can start provisioning the resources of our project.
Provisioning tools
From now on we will not use the portal to provision our resource group, ASA job and storage account. Instead we will using both the Azure CLI (AzCLI) and PowerShell.
Why scripting? Because if we’re to do modern ALM, we should thrive to never use graphical interfaces. Every steps we take, we should be able to automate - and we will in the following articles.
Why two tools? We would only use the AzCLI if we could. In my opinion it’s simpler and more practical. But at the time of writing, it doesn’t have an option to deploy ASA jobs. That’s what we will use PowerShell for. We could do everything in PowerShell instead, but that would be too easy, wouldn’t it?
It is to be noted that it is usually a pain to get PowerShell happy, and in the right version.
- For the Azure CLI, the install procedure is straightforward, particularly on Windows where there’s an executable
- Once installed, do run the
az logincommand in a terminal (cmd) to connect your environment to your Azure subscription - The environment under which the Az CLI scripts are usually ran is bash, since the CLI itself is cross-platform. Windows 10 offers a bash experience via the WSL (Windows Subsystem for Linux) available after a quick install. I highly recommend going through those steps and starting to use the WSL, but if it’s not possible, the walk-around is to do everything in PowerShell instead
- Once installed, do run the
- For PowerShell, two steps:
- While not mandatory, it’s better (and actually the only option cross-platform) to install version 6.x or above
- It’s an awkward dance of going to the release page, finding a version we like (usually the latest neither preview or release candidate, v6.2.3 at the time of writing), looking under assets and finding the right version (…-win-x64.msi for Windows folks)
- Once this is done, we will need to install the Azure PowerShell Az module, which should be easy… well, if you hadn’t already installed the Azure PowerShell AzureRM module. In which case you will need that PowerShell version 6.x or above, since AzureRM can’t live there, or to uninstall AzureRM from your existing environment (but what about your existing scripts?)
- Let this be a good reminder that we will often find commands for AzureRM (it’s older, so more docs and blog posts about it) that won’t work as is in Az. But usually an equivalent command exists, we just need to find them in the doc. Why there is 2 flavors of Azure PowerShell is explained here.
- If something misbehaves, have you tried turning it on and off again?
- I sometimes have issues where VSCode get lost in the version of PowerShell to use in its terminal (to be honest, it’s me that gets lost, not VSCode). Restarting the app usually solves that. Using the PowerShell Integrated Console in the VSCode terminal displays an icon that shows 6.x version of PowerShell used - this console usually appears when editing a
.ps1file. An alternative is to select PowerShell Core as the default shell. Be sure to have installed the Az module in the right version ($PSVersiontable.PSVersion) of PowerShell. - I once got
Your Azure credentials have not been set up or have expired, please run Connect-AzAccount to set up your Azure credentialserror message despite just having usedConnect-AzAccount, I usedRemove-AzAccountto remove the account and start again
- While not mandatory, it’s better (and actually the only option cross-platform) to install version 6.x or above
Hopefully this didn’t take a whole afternoon, so we still have time to use these tools.
Provisioning scripts
We will now write two scripts:
- One in the Azure CLI, to provision the resource group and storage account
- One in PowerShell Core Az, to provision the empty ASA job
These scripts won’t be automated yet (if ever), so they won’t be fancy (parameterized, idempotent…). We’re writing them to be ready for provisioning automation when need be. In the meantime, if we need to quickly delete our existing assets (to pause consumption) and restart from scratch the following day, it will be very comfortable to do so (deleting the resource group in the portal, running the scripts again from VSCode).
Step 1 : Azure CLI
In VSCode, in our project, we can create a new folder named Provision. In that folder, let’s add our first file: provision01.azcli. The fact we named it .azcli made it an Azure CLI script, which should get VSCode to chime in about an extension available for it (we can use that if it didn’t). Now that we’re using the same IDE to write our provisioning scripts, in the same solution, that means being able to version control those scripts in the same repository as the project. Neat.
Let’s write that script. Note that we can run all or part of it in the VSCode terminal by using CTRL+':
# Using Bash (WSL if Windows)
bash

# Login to Azure
az login

# If necessary (multiple subscriptions available), select the appropriate one
az account list --output table
az account set --subscription "mySubscriptionNameGoesHere"

# Set variables (bash syntax)
_location="canadacentral"
_suffix="staging"
_datecreated=`date +"%Y%m%d"`

_rg_name="rg-asatest"
_rg_name+=$_suffix
_sa_name="saasatest"
_sa_name+=$_suffix
_sa_container="container001"

# Create a resource group (look at these tags!)
az group create --location $_location  --name $_rg_name --tags 'createdby=somebodyNice' 'datecreated='$_datecreated 'environment=sta' 'purpose=stream-processing'

# Create a storage account
az storage account create \
    --name $_sa_name \
    --resource-group $_rg_name \
    --location $_location \
    --sku Standard_LRS \
    --encryption blob \
    --kind StorageV2

# Get the key of that storage account to create a storage container later
_key1=$(az storage account keys list -g $_rg_name -n $_sa_name --query '[0].value' -o tsv)

# Create a storage container
az storage container create --account-name $_sa_name --account-key $_key1 --name $_sa_container
Executing that script should give us a resource group rg-asateststaging, inside of which we’ll find a storage account saasateststaging, itself hosting of container container001. We can always use the Azure portal or the Azure Storage Explorer to check for ourselves.
Step 2 : PowerShell Az
To provision an ASA job using PowerShell, we will use the New-AzStreamAnalyticsJob command. According to the documentation it requires a job definition file to do so. We’ve seen one of these before: the JobConfig.json we can find in our project folder. But let’s be more generic than that, and create a minimal definition file, adding a new JobTemplate.provision.json file to our Provision folder with the following content:
{
    "location":"CanadaCentral",
    "properties":{
      "sku":{
        "name":"standard"
      },
      "eventsOutOfOrderPolicy":"adjust",
      "eventsOutOfOrderMaxDelayInSeconds":10,
      "compatibilityLevel": 1.1
    }
  }
This way we’ll have a script able to generate a bare bone ASA job that we can reuse in any project.
Now to the ASA job itself. Again, since the Az CLI can’t help us, we’ll add a second file provision02.ps1 to our Provision folder. This time the .ps1 file extension should trigger VSCode to mention its PowerShell extension. This time we can run selection using F8 (yes this is not the same shortcut as the CLI, it can be remapped but please don’t ask me):
# Login to Azure
Connect-AzAccount

# If necessary (multiple subscriptions available), select the appropriate one
Get-AzSubscription
Get-AzSubscription -SubscriptionName "mySubscriptionNameGoesHere" | Select-AzSubscription

# Create a Stream Analytics job
$suffix = "staging"

$rg_name = "rg-asatest$suffix"
$jobName = "MyStreamingJob$suffix"

$currentLocation = Get-Location
$jobDefinitionFile = "$currentLocation\Provision\JobTemplate.provision.json"

New-AzStreamAnalyticsJob `
  -ResourceGroupName $rg_name `
  -File $jobDefinitionFile `
  -Name $jobName `
  -Force
Checking in the portal, we should also now have an empty Streaming Analytics job in our resource group:
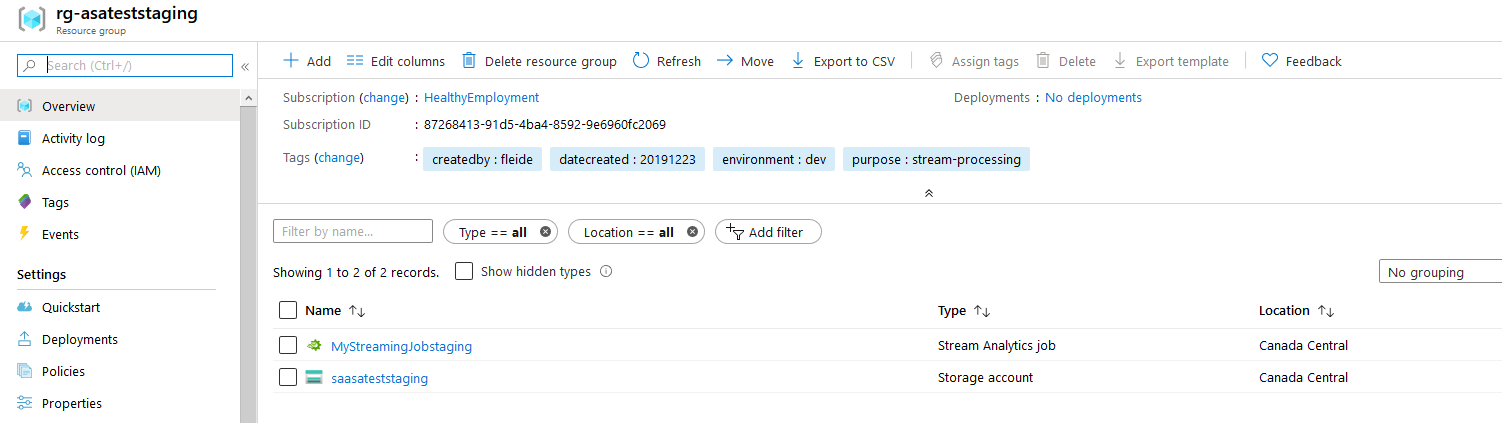
figure 2 - Screenshot of the Azure portal: content of our resource group
Of course we committed and pushed all of these changes regularly to our repo… but if we hadn’t, now would be a good time.
Live ASA Job
Now that we have a live input and a live output, let’s wire them in our Stream Analytics project.
In VSCode:
- For the live input, from the tutorial, steps 1 to 5
- For the live output, from the tutorial, steps 1 to 5
Finally we can edit our query (replacing the names of input/output by the name we defined):
SELECT
    deviceId,
    avg(temperature) as avg_temperature_t5,
    COUNT(*) as cnt_records_t5,
    System.Timestamp() AS EventAggregatedTime
INTO [BlobStorage1]
FROM [IoTHub1] TIMESTAMP BY EventProcessedUtcTime
GROUP BY deviceId, TumblingWindow(second,5)
Yes, this is a slightly more complicated query that the one we can find in the tutorial (SELECT * INTO [BlobStorage1] FROM [IoTHub1] HAVING Temperature > 27). Because if we’re using ASA, that means we’re doing stateful stream processing. If we don’t need to maintain a state (aggregation/accumulation and/or time windowing), then we could use an Azure Function instead.
Let’s test a local execution (Run locally) on a live input (remembering to start the simulator if need be):

figure 3 - Screenshot of VSCode: local live ASA run
Now that this is done (and after doing a commit/push), we can deploy that job to Azure. In the next article, we will see how to use Azure Pipelines to generate the ARM template files and deploy them on the fly, but for now we can just use the VSCode command ASA: Submit to Azure to do so (CTRL+SHIT+P or top of editor with query open). Of course we will select the job we just created, and publish to Azure.
Deploying the job will not start it. So if we want to see the job running in Azure (and see output files in our target storage account), we can start it from the Azure portal or in VSCode (Azure tab on the left, finding the job in the subscription and right-clicking to start).
After a short wait, the job should be running:
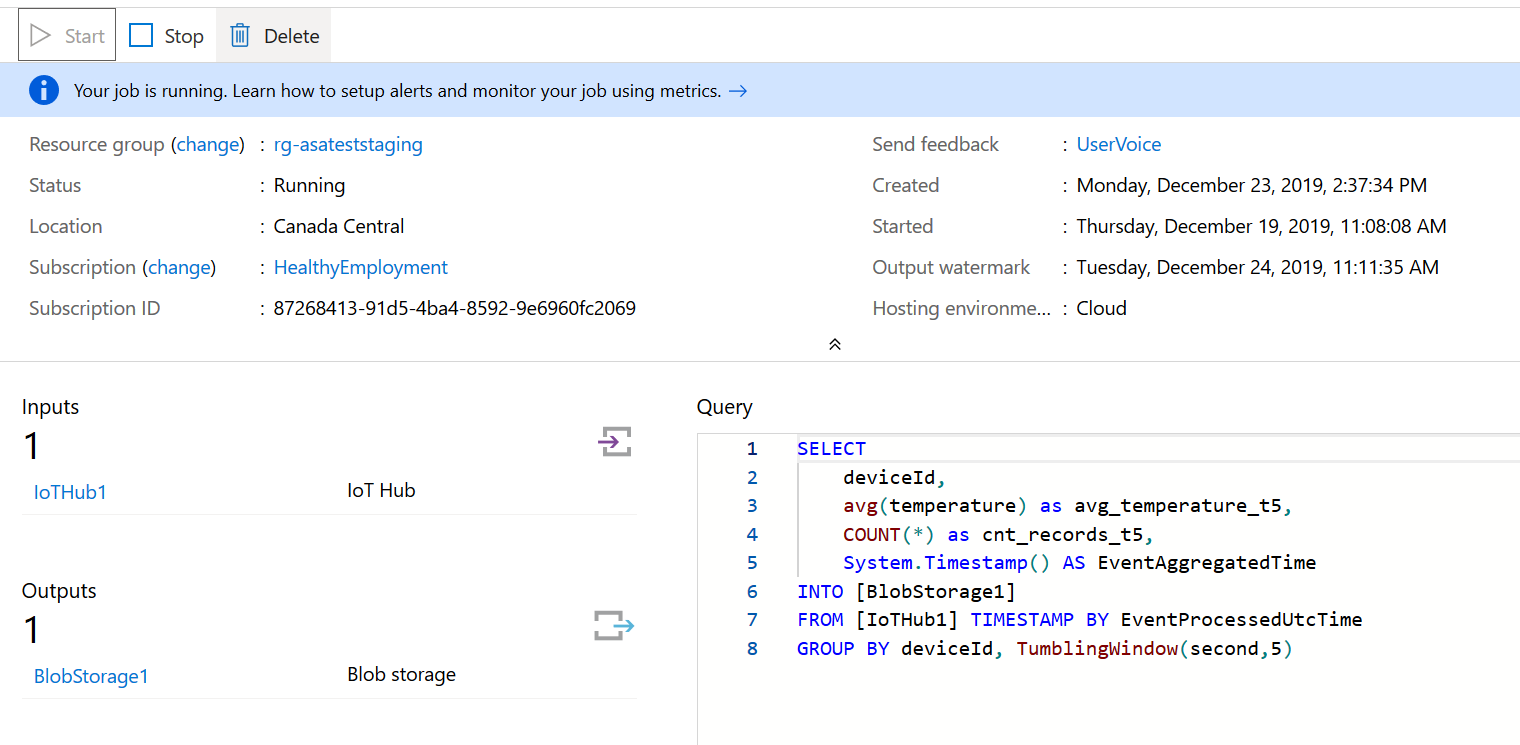
figure 4 - Screenshot of the Azure portal : cloud ASA run
REMEMBER TO STOP THE JOB if you don’t need it. It’s a piece of compute that runs 24/7, so even if it’s cheap it will still eat your budget.
The rest of the resources, including the shared ones, are close to free, so no real worries there. Worst case they can be deleted, since we have the scripts to rebuild them on demand.
Next steps
Part 1: 100 - The story of 2 pipelinesPart 2: 101 - Local developer experiencePart 3: 102 - Provisioning scripts and live job- Part 4 : 103 - Continuous build
- Part 5 : 104 - Automated deployment
- Part 6 : 105 - Unit testing
- Part 7 : Integration testing - to be written
