High level picture of hosting a static site (blog) on Azure with details on how to wire a custom domain (root and www) with HTTPS support. It’s actually easier that it sounds.
Let’s start by noting that $2 out of the $2.5 mentioned in the title are for the custom domain name and associated SSL certificate (for HTTPS). Static content hosting, CDN (content delivery network) and networking in Azure cost less than 50 cents per month for this application. To be fair, this is not the most read blog of the Internet.
Also I’m using Jekyll for this blog, and it’s been good to me so far.
Summary
The main components used are:
- From non-Microsoft providers
- a custom domain name from a registrar of our choosing (I’m using Gandi) - here
eiden.ca - a SSL certificate to enable HTTPS, I recommend Namecheap (PositiveSSL) to procure one. This certificate will need to be generated for the custom domain name we created above (we’ll see how). THIS IS IF you want HTTPS for the root of the custom domain (https://eiden.ca), even if you just want it to redirect to www. This was a must have for me, and the reason for the existence of this very article. If you don’t care about the root, you can use the managed certificate included in Azure CDN (which at the time of writing doesn’t support root).
- a custom domain name from a registrar of our choosing (I’m using Gandi) - here
- In Azure
- a Storage Account with static web hosting enabled. That feature allows to serve static content (html, css, javascript, images) directly from a container
- a Key Vault to help generate the certificate and store it once issued by the provider
- a CDN Profile, to cache the content and optimize performance and cost. The CDN profile loads our content from the storage account, distributes in its worldwide network, and serves to visitors in a scalable fashion automatically
- a DNS Zone, to manage the name resolution of our custom domain and point the traffic towards the CDN profile
On a picture:
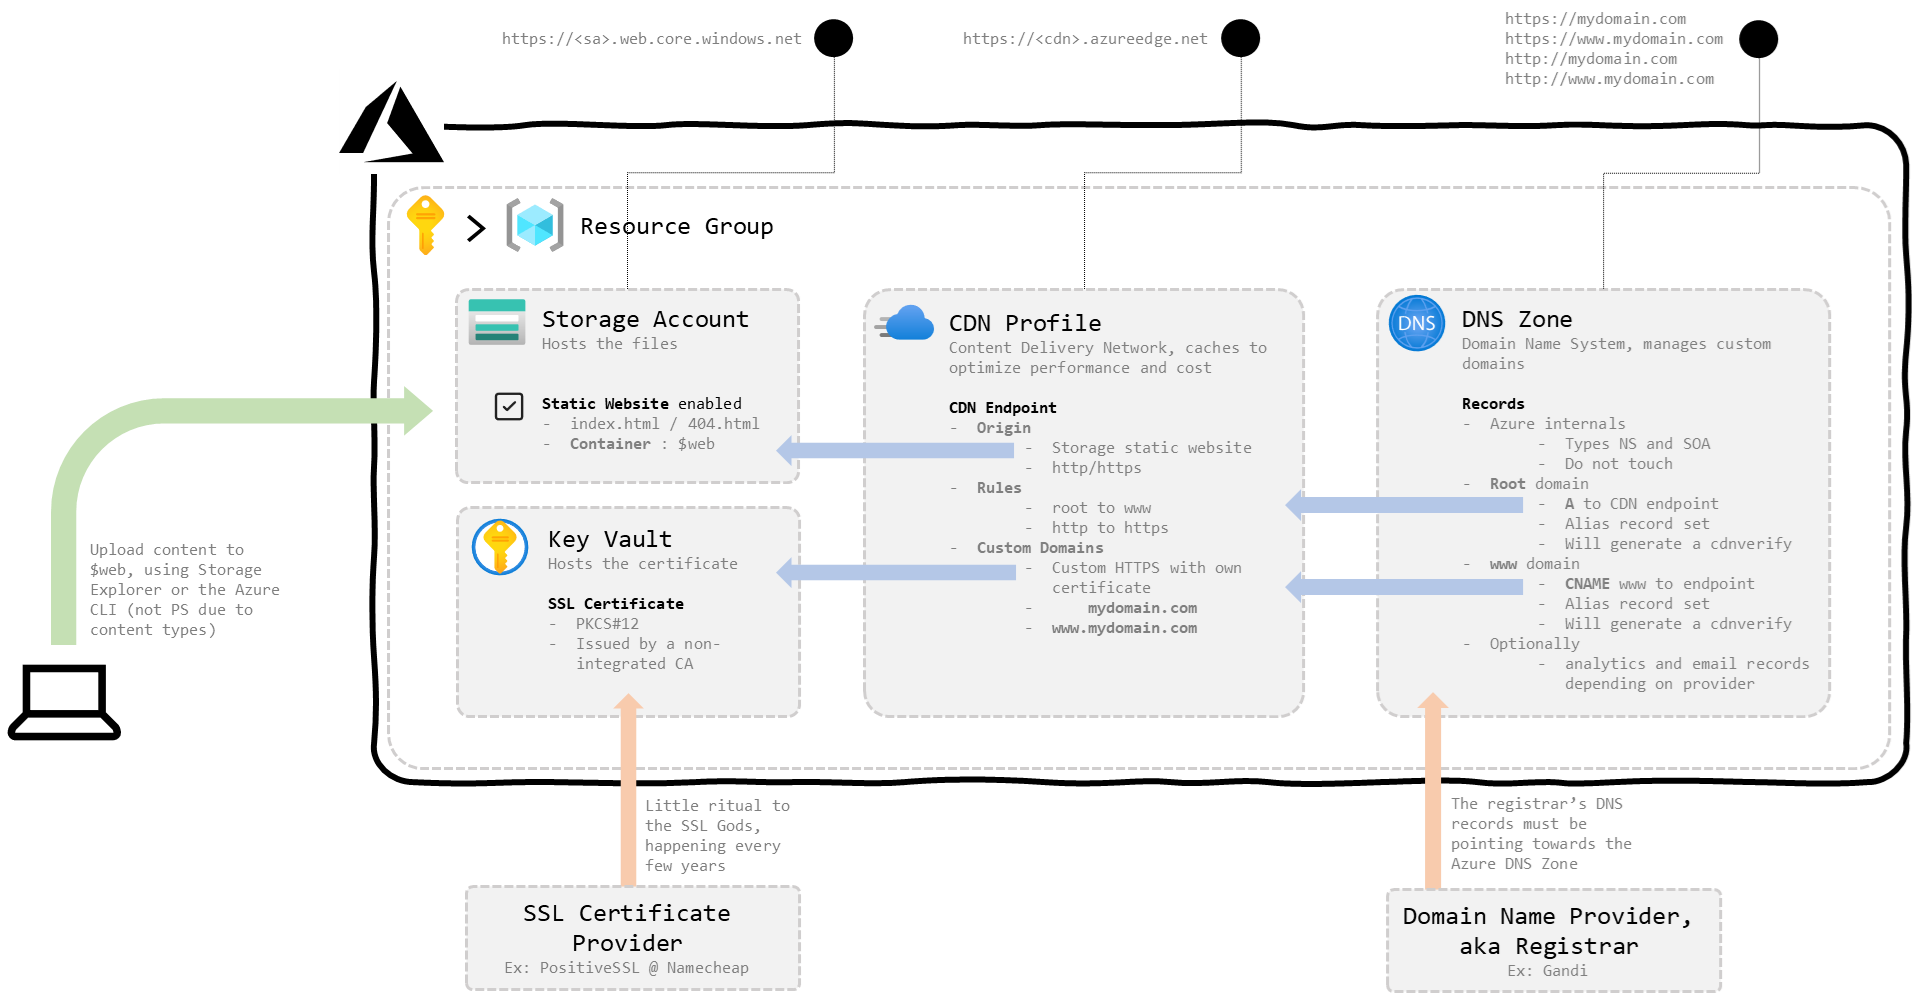
figure 1 : Schema of the solution
Let’s jump into it.
Step 1 and 2 : Starting with the Static Website and the CDN Profile
First we will follow the parts 1 and 2 from this awesome tutorial from John M. Wright to get the storage account and CDN profile set up. Let’s not go further than part 2, we’ll switch to another guide for the following step.
In part 2, I’ve personally used the Azure CDN from Microsoft and it went great.
At this point, what we should have is this:
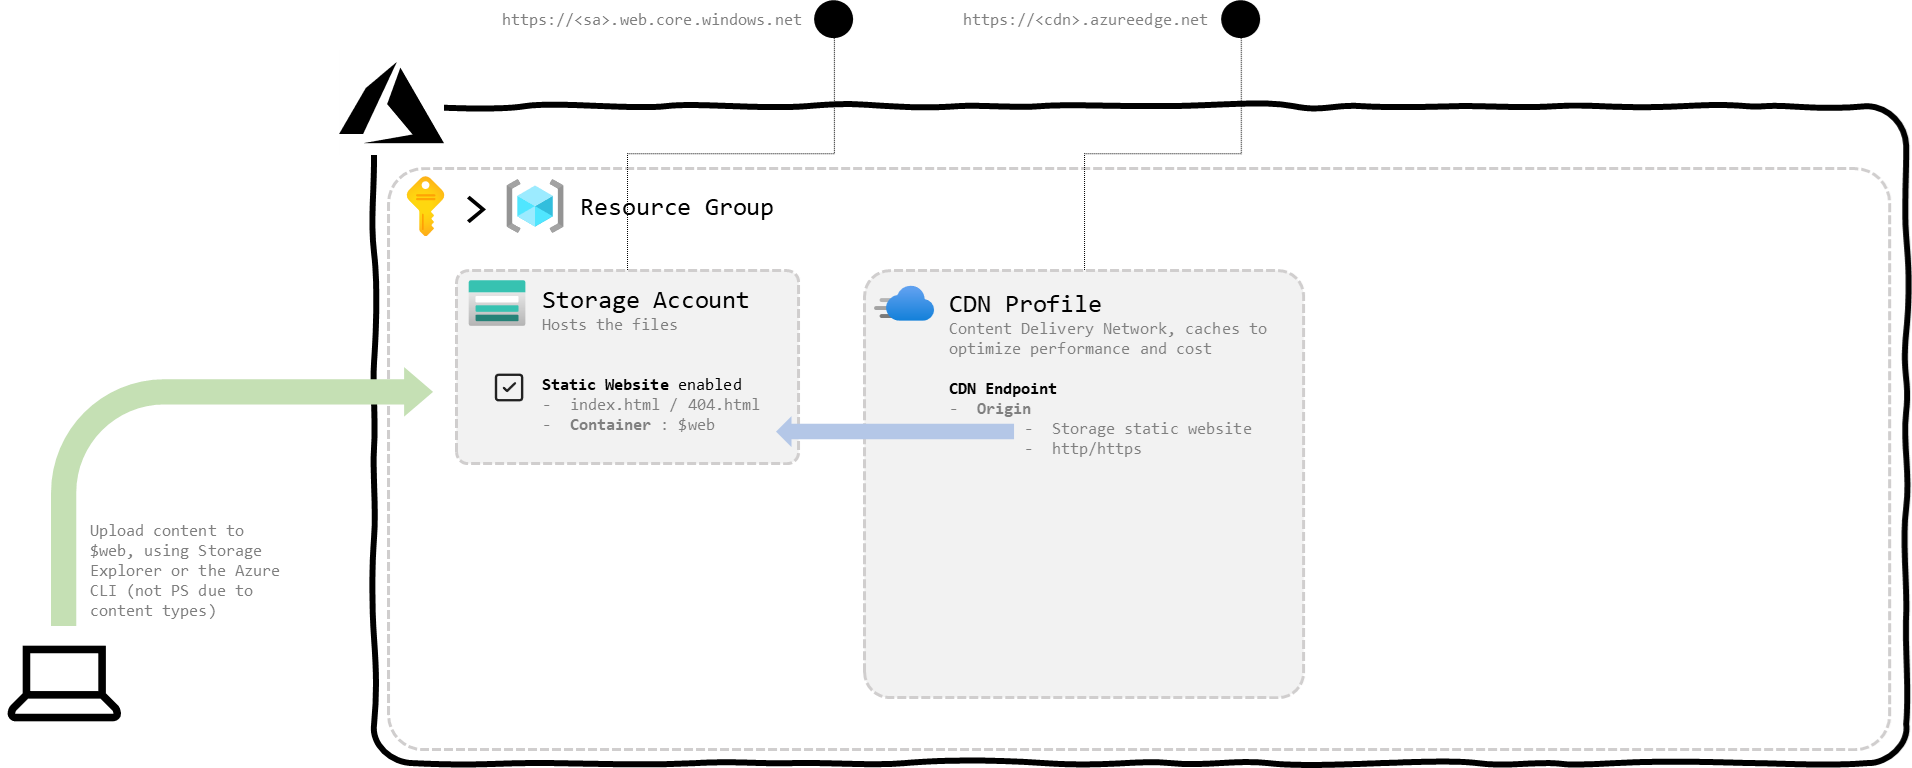
figure 2 : a storage account with static hosting and a CDN endpoint
We can already see our content online at the following URLs:
https://<sa>.web.core.windows.net, directly from the storage accounthttps://<cdn>.azureedge.net, from the CDN endpoint
To be noted that to upload our content to the $web container of the storage account, the best option is to use the Azure CLI or Azure Storage Explorer. I tend to default on PowerShell but here Set-AzStorageBlobContent doesn’t manage the content-types of the files it uploads.
The syntax in the CLI is straightforward (in a PowerShell host, cmd or bash terminal) :
# Here the parameter syntax is PowerShell and I'm already logged in the CLI via az login
$contentLocalPath = "C:\..."
$storageAccountName = "mystorageaccount"
az storage blob upload-batch -s $contentLocalPath -d '$web' --account-name $storageAccountName
Step 3 : Adding a DNS Zone
To add the DNS Zone, let’s switch to the part 3 of this exhaustive guide from Rune Aamodt.
Here we will not only create a record for the www subdomain (type CNAME, alias record set to the CDN endpoint) like in the guide, but also for the root (apex) domain (type A, alias record set to the same CDN endpoint).
This is how it should look now (bold being the ones we created above):
| Name | Type | TTL | Value | Alias resource type | Alias target | Comment |
|---|---|---|---|---|---|---|
| @ | A | 3600 | - | Azure CDN | eiden-ca | Root/apex domain record |
| @ | NS | 172800 | ns1-07.azure-dns.com… | Azure stuff | ||
| @ | SOA | 3600 | Email:… Host: ns1-07.azure-dns.com… | Azure stuff | ||
| @ | MX | 3600 | 10 spool.mail.gandi.net.,50 fb.mail.gandi.net. | Gandi stuff, for the email addresses of the domain | ||
| @ | TXT | 3600 | “v=spf1 include:_mailcust.gandi… | Gandi stuff, for the email addresses of the domain | ||
| cdnverify | CNAME | 3600 | cdnverify.eiden-ca.azure… | Verification record created automatically for alias record sets | ||
| sa | CNAME | 3600 | external.simpleanalytics.com. | Record required by the analytics provider I use here | ||
| www | CNAME | 3600 | - | Azure CDN | eiden-ca | www subdomain record |
| cdnverify.www | CNAME | 3600 | cdnverify.eiden-ca.azure… | Verification record created automatically for alias record sets |
This is where we will have to log in to the admin portal of our Domain Registrar (Gandi for me) to switch our custom domain to use external nameservers. We will provide the 4 Azure ones listed in our DNS zone.
This can be a frustrating step since making changes to DNS records can take hours to take effect. Let’s try and be patient…
On Gandi it looks like this:
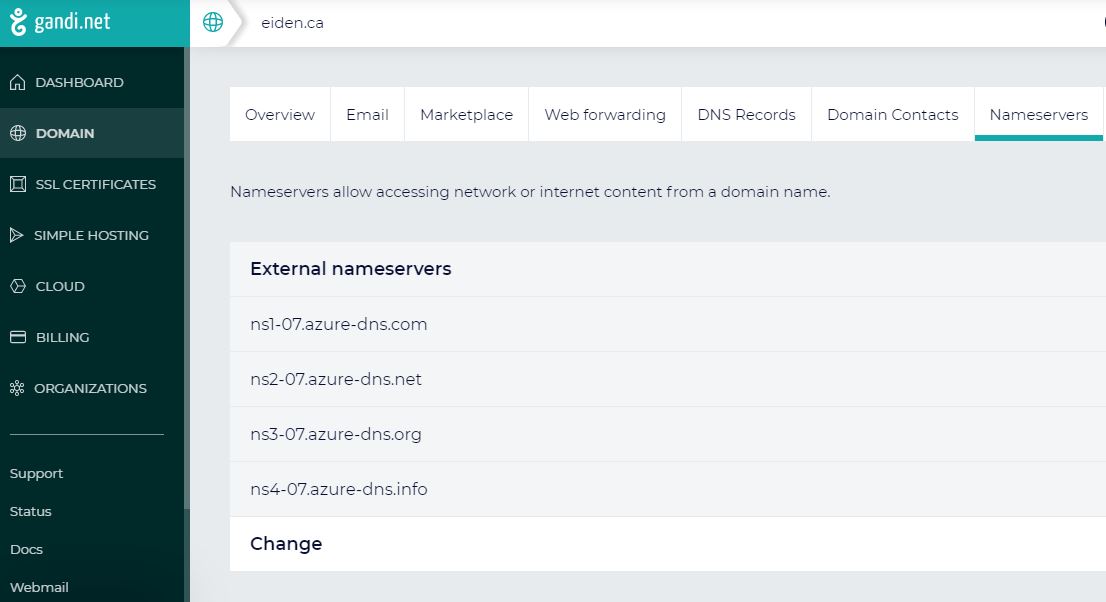
figure 3 : updating nameservers in Gandi
Now that we have the DNS Zone setup, the situation looks like that:
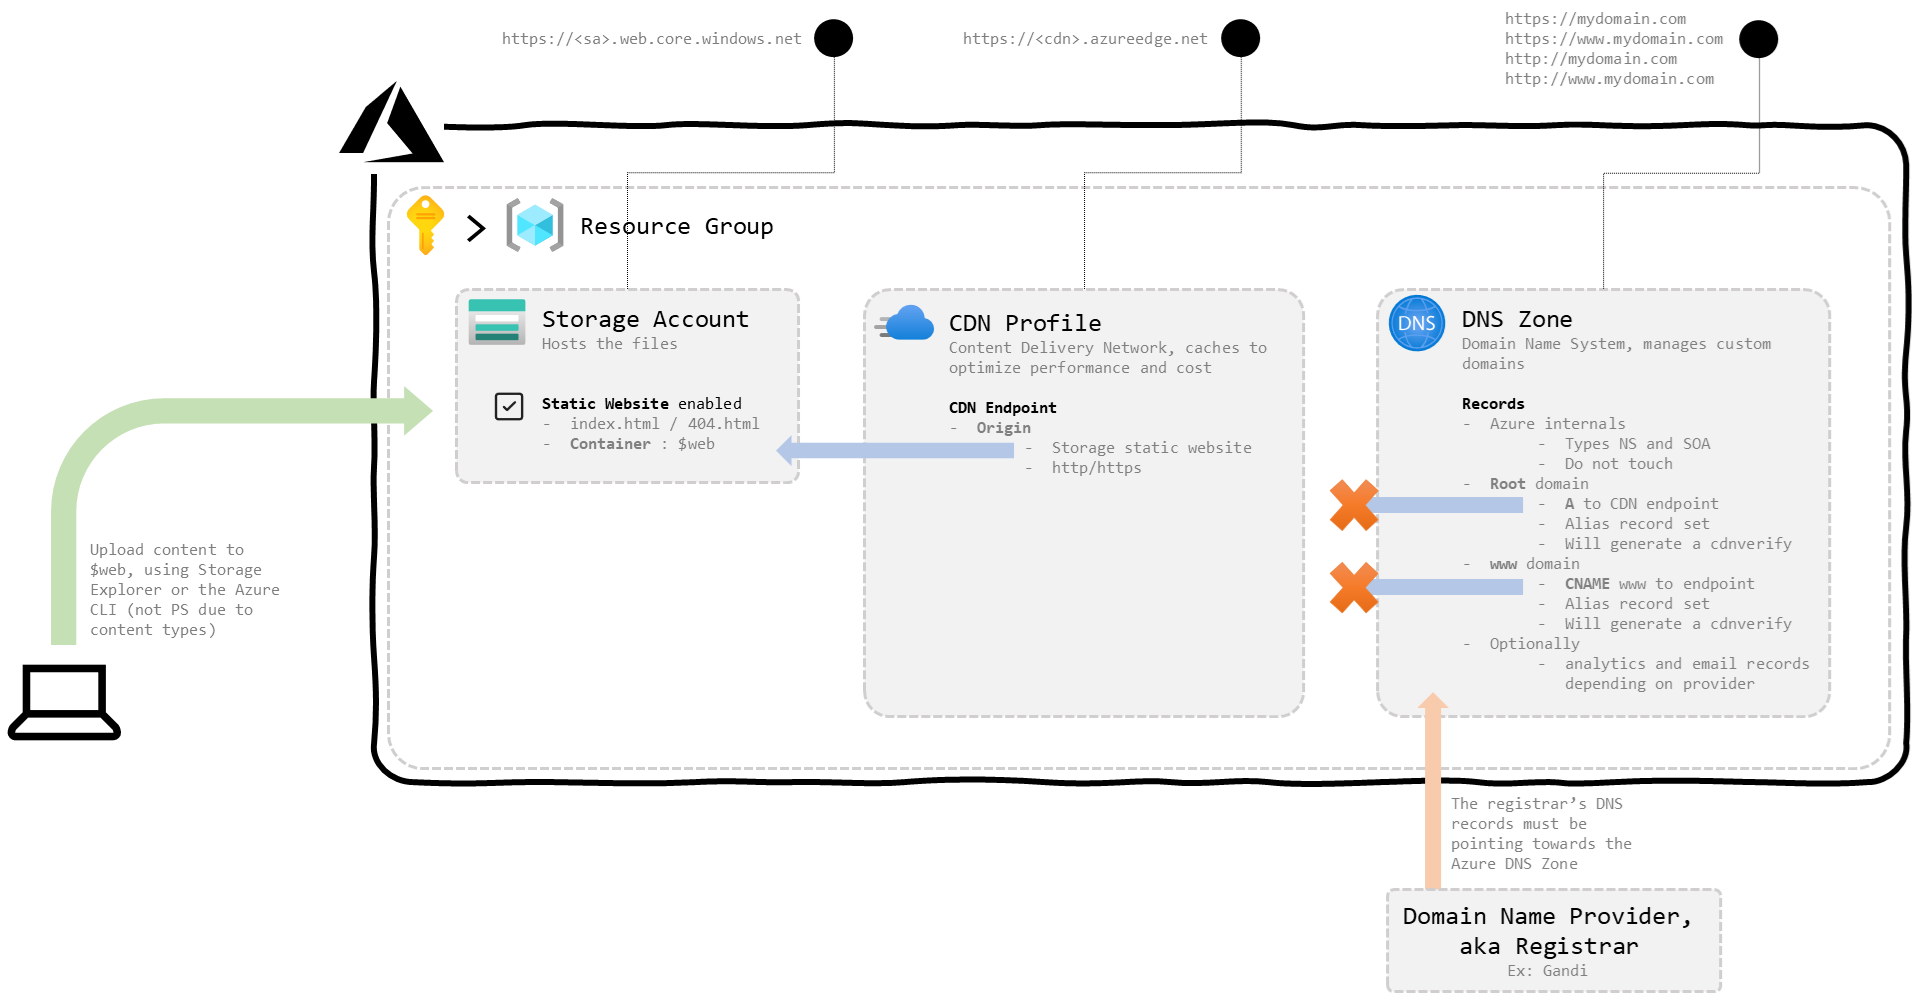
figure 4 : A DNS Zone is added to the picture, but the CDN profile still needs to be updated
Now let’s head back to the CDN endpoint to add the custom domains we just created here.
Step 4 : Enabling HTTPS for the CDN Endpoint Custom Domains
We will head back to the first tutorial, but before let’s quickly sum up the situation. As I mentioned in the summary, Azure CDN offers managed certificate for HTTPS, but at the time of writing they are not available for the root / apex domain.
This is why we need to bring our own certificate.
Before heading back into the tutorial, let’s review the 3 high level steps of that process:
- In an Azure Key Vault, we will create a new certificate that will be issued by a non-integrated CA (Namecheap). Contrary to what’s in the guide, use PKCS#12 (even if we don’t understand the details, it’s just easier)
- We will then download the CSR (
Certificate Signing Request) from Azure Key Vault, upload it to our SSL certificate provider to get processed, get the PKCS#12 file generated there back into Azure Key Vault (merge signed request) - Back in the CDN Endpoint, we will create the custom domains (root and www), with HTTPS, using our own certificate hosted in Key Vault
So let’s head back to the tutorial from John for part 4 and 5 (sorry there’s no direct links) that explains everything in details.
Step 5 : Adding CDN rules
Finally, we need to add some rules in the CDN Rules engine to sort traffic coming from the root and subdomain on both HTTP and HTTPS. I wanted everything to end on https://www.eiden.ca, but you can adapt the rules below for a different result:
- Rule 1 :
http://requests need to be redirect tohttps://www... - Rule 2 : root requests need to be redirected to
https://www...
For that we can get inspiration from the step 5 of the second guide to get something looking like that:
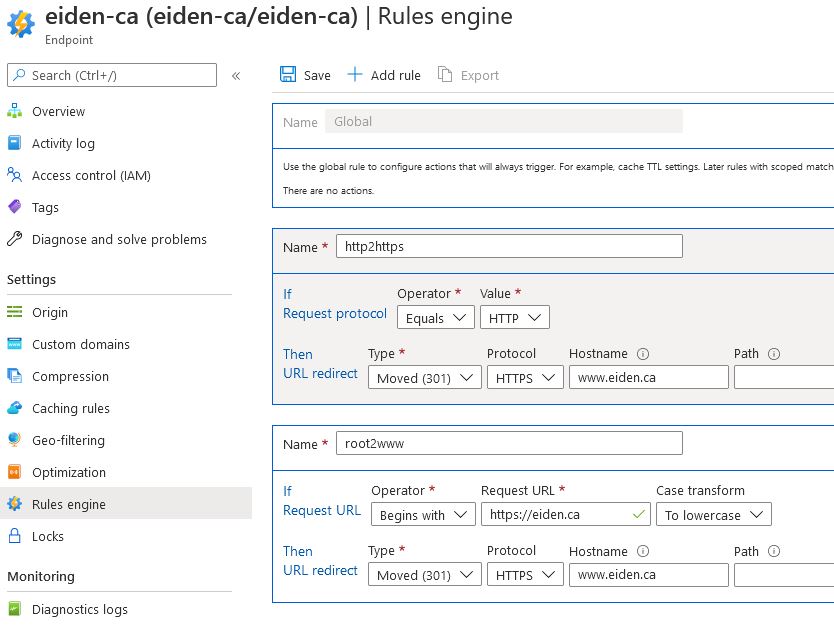
figure 5 : Rules to manage traffic across domains and protocols
The details of these rules:
- Rule 1
- Name : http2https
- If Request protocol
- Operator :
Equals - Request URL :
HTTP
- Operator :
- Then URL redirect
- Type :
Moved (301) - Protocol :
HTTPS - Hostname :
www.eiden.ca
- Type :
- Rule 2
- Name : root2www
- If Request URL
- Operator :
Begins with - Request URL :
https://eiden.ca - Case transform :
To lowercase
- Operator :
- Then URL redirect
- Type :
Moved (301) - Protocol :
HTTPS - Hostname :
www.eiden.ca
- Type :
The picture is now complete:
figure 6 : The whole thing wired up together
Step 6 : Flushing the CDN profile
As discussed earlier, the CDN caches our files to serve them in an optimal fashion. Like any cache, it will need to be expired and reloaded when new content is uploaded to the storage account. This is not done automatically.
In the Azure CDN world, this operation is called a purge. It can be done in the Azure portal or via script.
In my case I’m using the PowerShell Az module (not to be mistaken with the AzureRM module) to do that every time I publish a new article:
# Already logged via Connect-AzAccount

$cdnProfileName = "eiden-ca"

Get-AzCdnProfile `
  | Where-Object {$_.Name -eq $cdnProfileName} `
  | Get-AzCdnEndpoint `
  | Unpublish-AzCdnEndpointContent -PurgeContent "/*"
Closing
So really, $2.5 per month?
- Namecheap SSL Certificate : $9 per year
- Gandi custom domain (
.ca) : $15 per year - Everything Azure : $.5 per month
Total : $2.5 per month!
